Configuring the DL-m and DA-m in the CLI
Once you have launched instances for the DL-m and DA-m in AWS, you are ready to configure them in their respective CLIs. Use the following steps:
Get IP Addresses for VMs
When the VMs for your deployment are up and running, you are ready to log in to their consoles and assign roles.
First, however, you need the IP addresses that AWS assigned when you launched your instances:
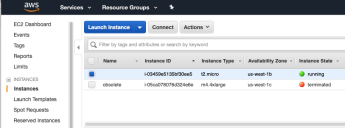
- Log in to your EC2 Dashboard.
-
Click on Instances. The active instances appear.
-
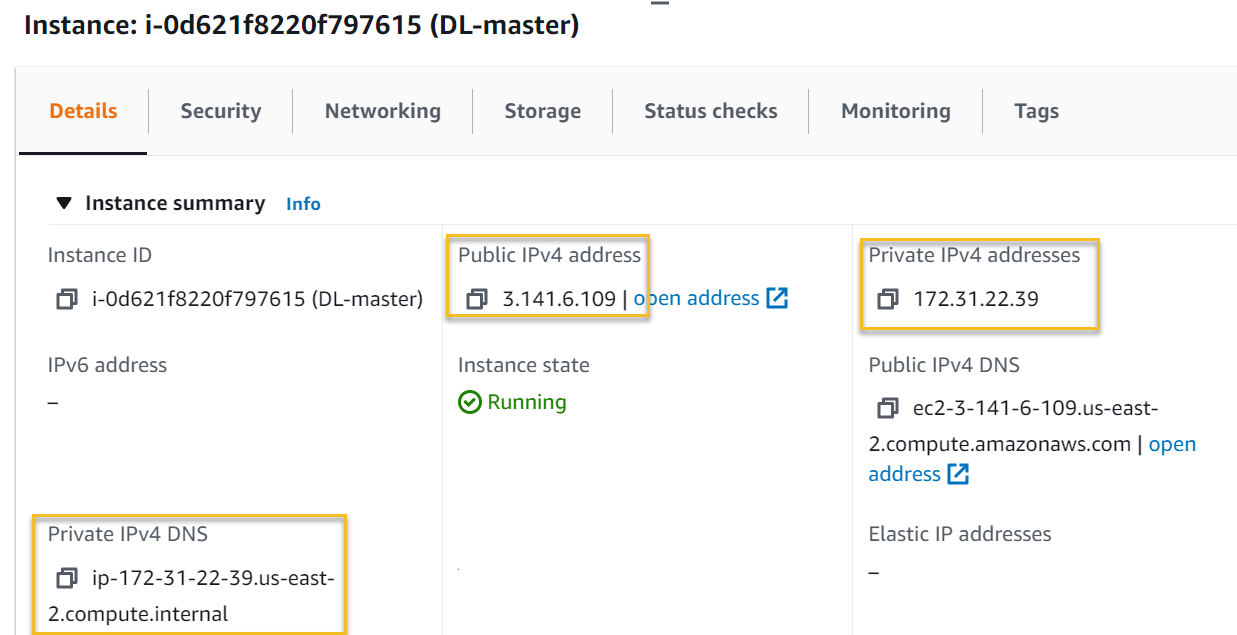
Check the box for the DL-m instance to view its Details in the lower panel.
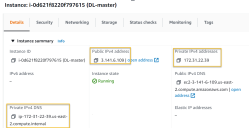
- Copy the Public IP, Private IP, and Private DNS.
- Repeat this procedure for the DA-m instance.

Configure the DL-m in the CLI
- Access the console of the DL-m VM using the private IP address you copied in the previous procedure.
- Log in. The default user/password is aella/changeme. You are immediately prompted to change the password.
- Change the password.
- Reconnect to the DL-m VM using the new password you just set.
- The prompt changes to DataProcessor>.
-
Enter the following command:
show hostname -
The default hostname in public cloud environments typically includes the private IP address of the host and may not be immediately meaningful when you see it later on in the Stellar Cyber user interface. You can change it to something meaningful using the set hostname <hostname> command. For example:
DataProcessor> set hostname DL-masterIf you do change the hostname, you must reboot the virtual machine to apply the change.
-
Set the role of the VM to DL-master as follows:
DataProcessor> set role DL-master -
Set the name of the cluster using the set cluster_name <cluster_name> command. For example:
DataProcessor> set cluster_name DL -
Set the cluster size as follows:
DataProcessor> set cluster_size 1 -
AWS automatically configures DNS and NTP settings for the VM. You can verify the settings with the show dns and show ntp commands, respectively.
-
Configure the DL-m VM to use the secondary disk you attached in AWS as follows:
-
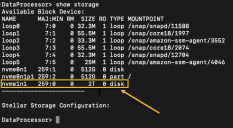
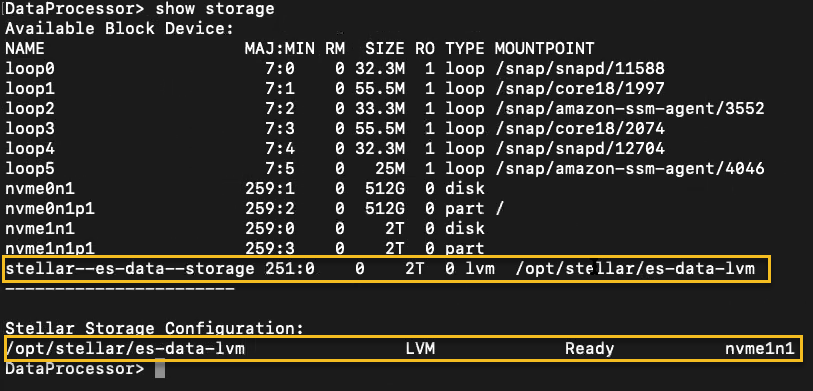
Run the show storage command to get the name of the secondary disk. For example:
-
Use the add storage blk <disk_name> command to add the secondary disk, followed by Y to confirm. For example:

-
Use the show storage command to verify the newly added disk:

-
-
Use the set cm <ip_address> command to set the IP address of the Data Lake master's management interface as follows:
-
Since we are configuring the DL-m VM right now, we can use show interface to see our internal IP address. For example:
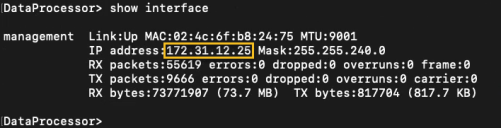
-
Enter the following command using the IP address you just retrieved:
DataProcessor> set cm <ip_address of DL-m>
-
-
Set the Maximized Data Storage (MDS) option according to the size of the cluster:
-
If this DL-m uses two or fewer worker nodes, enable the MDS option on the DL-m with the following command:
DataProcessor> set mode MDS enable -
If this DL-m uses three or more worker nodes, disable the MDS option on the DL-m with the following command:
DataProcessor> set mode MDS disable -
You can use the show mode command to see the current setting for the MDS option.
The MDS option specifies whether the node stores data itself (enabled) or only manages storage and ElasticSearch operations (disabled). As you scale up to a cluster deployment with three or more DL-worker nodes, you disable MDS on the DL-Master and provision it with less disk space. The DL-worker nodes have MDS enabled and handle the actual storage while the DL-master provides storage management and search.
-
-
Use the set otp <one-time-password> command to license the DL-m:
DataProcessor> set otp <one-time-password/License Key>After license activation, you can find the OTP for your installation in the Licensing page.
-
Use the reset command to apply your changes. This command starts all Stellar Cyber microservices using your new settings.
- Confirm the reset. The image is downloaded (which can take a while, depending on your network) and installed.
-
Verify that everything is installed, ready, and running with the
show statuscommand. A screen similar to the following appears as it is installing:
When it finishes the status is similar to:


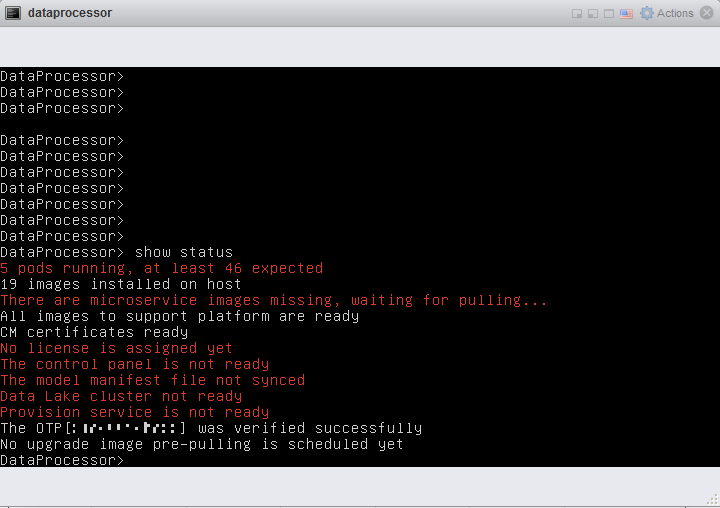
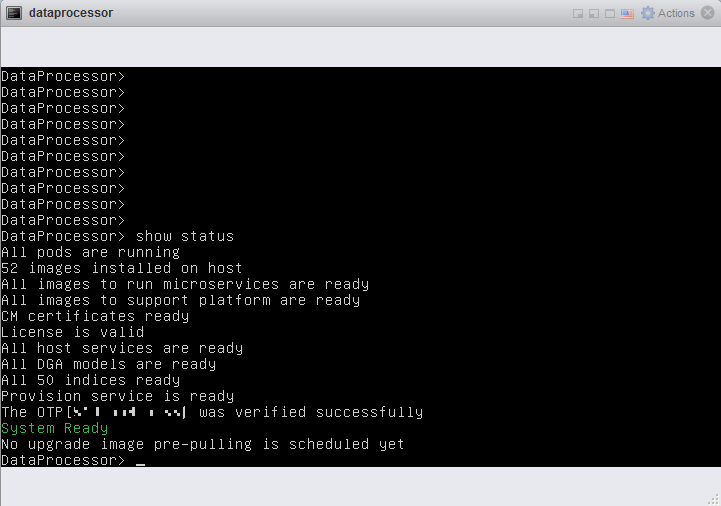
The installation is complete and the DL-m is now functional.
Configure the DA-m in the CLI
-
Access the console of the DA-m VM using the private IP address you copied in Get IP Addresses for VMs.
-
Log in. The default user/password is aella/changeme. You are immediately prompted to change the password.
-
Change the password.
-
Reconnect to the DA-m VM using the new password you just set.
-
The prompt changes to DataProcessor>.
-
Enter the following command:
show hostname -
The default hostname in public cloud environments typically includes the private IP address of the host and may not be immediately meaningful when you see it later on in the Stellar Cyber user interface. You can change it to something meaningful using the set hostname <hostname> command. For example:
DataProcessor> set hostname DA-masterIf you do change the hostname, you must reboot the virtual machine to apply the change.
-
Set the role of the VM to resource as follows:
DataProcessor> set role resourceMake sure you set the role to resource! You'll change the role for this resource in the Stellar Cyber user interface in Configure the DL-m in the CLI
-
AWS automatically configures DNS and NTP settings for the VM. You can verify the settings with the show dns and show ntp commands, respectively.
-
Use the set cm <ip_address> command to set the IP address of the Data Lake master's management interface as follows:
-
Refer to the private IP address of the DL-m you copied in Get IP Addresses for VMs.
-
Enter the following command using the IP address you just retrieved:
DataProcessor> set cm <private_ip_address of DL-m>
-
-
Use the reset command to apply your changes. This command starts all Stellar Cyber microservices using your new settings.
-
Confirm the reset. The image is downloaded (which can take a while, depending on your network) and installed.
-
Verify that everything is installed, ready, and running with the
show rolecommand. When the system reportsresource, the installation of the DA-m VM is complete. Next, we need to convert it from its current resource role to a DA-Master from within the Stellar Cyber user interface.
