Ingesting Logs over TLS
You can configure the sensor to ingest the following logs encrypted via TLS:
- rsyslog
- syslog-ng
- SentinelOne logs
- Palo Alto Cortex
To configure TLS log ingestion:
- Configure Stellar Cyber to ingest the logs.
- Configure the log sender to send the logs to the sensor.
Configuring Log Ingestion over TLS in Stellar Cyber
Stellar Cyber provides two options to secure a sensor's TLS log ingestion:
-
Use Stellar Cyber's self-signed CA Certificate. Download the certificate from the Edit Sensor Parameters dialog box in Stellar Cyber and install it in the log sender.
This approach has been available in previous releases and is still available in the 5.1.1 release.
-
Use a certificate purchased from a trusted commercial vendor. Upload the certificate and private key to the Stellar Cyber DP in the System | Administration | Certificates page and apply the certificate to a sensor in the System | Collection | Sensors page.
This technique is new in the 5.1.1 release and is useful in situations where a vendor's deployment does not trust the self-signed certificate provided by Stellar Cyber (for example, Palo Alto Cortex).
A TLS handshake is a series of exchanges between a client and server to establish a secure connection across an unsecured network (Internet). In terms of Stellar Cyber, the client is a log sender and the server is a Stellar Cyber sensor. The exchanges that occur during the handshake are presented in the following illustration.

The server certificate that the sensor uses can either be signed by the server itself or by a Certificate Authority (CA). Here's what's involved with the creation and delivery of a self-signed server certificate:
-
The server generates a public-private key pair.
-
The server generates a server certificate containing its public key and other information, such as its version, serial number, and signature algorithm.
-
The server generates a hash, or message digest, of the certificate contents and encrypts the hash with its private key to create a digital signature.
-
The server appends the digital signature to the server certificate, making it a self-signed certificate.
-
The self-signed server certificate, which includes its public key, must be delivered to the client out of band—for example, on a USB drive or secure email—and added to the client's certificate store.
Here's what's involved with the creation and delivery of a CA-signed server certificate:
-
The server generates a public-private key pair.
-
The server creates a Certificate Signing Request (CSR), containing its public key and other information, and sends it to a CA.
-
The CA generates a hash and encrypts it with its private key, creating a digital signature.
-
The CA appends the digital signature to the server certificate, making it a CA-signed certificate.
-
The CA sends the certificate back to the server. The CA-signed server certificate includes the server's public key, the CA-encrypted digital signature, and other information.

The verification process of the server certificate and, by extension, the server itself proceeds like this:
-
The client extracts the digital signature and public key from the self-signed certificate or the public key from the CA certificate, which presumably it already has in its certificate store.
-
The client uses the public key to decrypt the digital signature.
-
The client generates a hash of the server certificate and compares it with the decrypted hash. If they match, the certificate is verified as authentic and unmodified.
-
The client uses the server's public key to encrypt a pre-master secret, which it sends to the server.
-
The client and server use the pre-master secret to generate symmetric session keys to encrypt and decrypt data transmitted in their session.
Configuring Log Ingestion over TLS Using a Self-Signed Certificate
To configure TLS log ingestion in Stellar Cyber using the self-signed certificate:
-
Click System | Collection | Sensors. The Sensor List appears.
-
Click for the data sensor you want to ingest TLS logs. The Edit Sensor Parameters window appears.
-
Enable Syslog TLS Enabled.
-
Click CA Certificate to download the self-signed public certificate for the sensor in case the client needs it.
-
Click Submit.
-
Open the appropriate TCP ports on your firewall, either 5140 for rsyslog or syslog-ng, or 5175 for SentinelOne.
-
Install the self-signed public certificate from the Stellar Cyber sensor on the log sender.
Some log senders (for example, ESET) include an option to Validate CA root certificates of TLS connections when you upload a certificate. Because the self-signed certificate from Stellar Cyber is not a true public certificate, you must disable any options that validate CA root certificates in order for TLS log ingestion using the self-signed certificate to work.
Configuring Log Ingestion over TLS Using a Commercial Certificate 
To configure TLS log ingestion in Stellar Cyber using a commercially purchased certificate:
-
Purchase one of the trusted certificates for your log source. For example, here is the list of trusted certificates for syslog and HTTPS forwarding from Palo Alto Networks' Cortex Data Lake. You can also refer to Generating Server Certificates for information on generating the Certificate Signing Request (CSR) file you will need to obtain a certificate for your sensor's domain from your service provider.
-
Log in to Stellar Cyber and navigate to the System | Administration | Certificates page.
-
Upload the certificate to Stellar Cyber. Click Upload, choose the Server Certificate option, and use the Choose File option to select the certificate and private key you want to use for TLS log ingestion. Refer to these instructions for details on uploading a certificate to Stellar Cyber.
-
Navigate to the System | Collection | Sensors page. The Sensor List appears.
-
Click for the data sensor you want to ingest TLS logs. The Edit Sensor Parameters window appears.
-
Turn on the Syslog TLS Enabled option, as illustrated below.

-
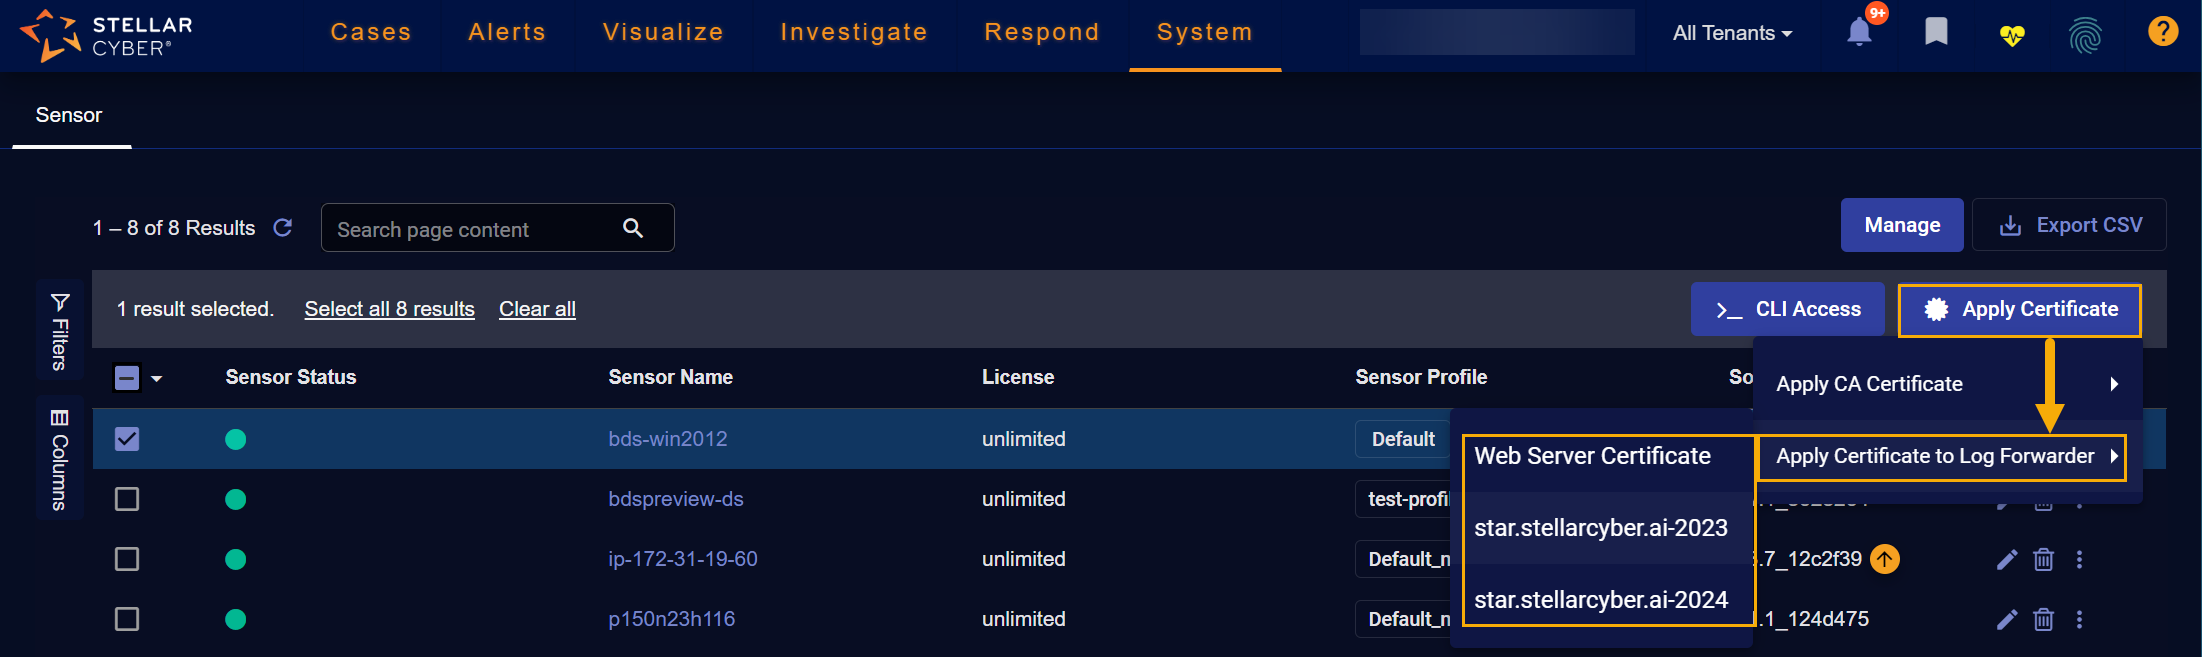
Select the sensor to which you want to apply the certificate by checking its box in the System | Collection | Sensors list.
-
Apply the certificate to a sensor using the Apply Certificate | Apply Certificate to Log Forwarder button in the System | Collection | Sensors list. The dropdown lists all server certificates that have been uploaded in the Certificates page.

The user interface does not let you apply a certificate to a log forwarder on a Server Sensor.
After applying the certificate, the selected sensor uses the selected certificate as the TLS certificate for log ingestion on all parser ports, including those configured in the System | Collection | Log Sources page.
-
Open the appropriate TCP ports on your firewall. For Cortex Data Lake, this is typically 443.
-
Configure your log source to send data to the sensor over the encrypted TLS connection.

Refer to Removing a Certificate from a Sensor for information on removing a log forwarder certificate from a sensor.
Configuring rsyslog to Send Logs to the Sensor
To configure rsyslog to send logs to the sensor:
- Install rsyslog.
- Install rsyslog-gnutls.
-
Edit the
/etc/rsyslog.conffile to add the following configurations (use your sensor IP address for the target):global(DefaultNetstreamDriverCAFile="/etc/pki/tls/private/cacert.pem")
action(type="omfwd" target="1.1.1.1" protocol="tcp" port="5140" StreamDriver="gtls" StreamDriverMode="1" StreamDriverAuthMode="anon")
- Restart the rsyslog service.
Use our example as a guideline, as you might be using a different software version.
The logs are now sent to the sensor and ingested.
Configuring syslog-ng to Send Logs to the Sensor
To configure syslog-ng to send logs to the sensor:- Install the syslog-ng client.
Edit the
/etc/syslog-ng/syslog-ng.conffile to add the following configurations (use your sensor IP address for the network and syslog):destination demo_tls_destination { network("1.1.1.1" port(5140) transport("tls") tls( ca-dir("etc/syslog-ng/cacert.pem")) ); }; destination demo_tls_syslog_destination { syslog("1.1.1.1" port(5140) transport("tls") tls(ca-dir("/etc/syslog-ng/cacert.pem")) ); }; log { source(s_sys); destination(demo_tls_syslog_destination);}; log { source(s_sys); destination(demo_tls_destination);};- Restart the syslog-ng service.
Use our example as a guideline, as you might be using a different software version.
The logs are now sent to the sensor and ingested.
