Generating Server Certificates
You can use an SSL certificate to secure communications between clients and the Stellar Cyber user interface. This topic describes how to generate the Certificate Signing Request (CSR) file you will need to obtain a certificate for your domain from your service provider. Once you obtain a certificate using these instructions, you can upload it to Stellar Cyber in the System | Administration | Certificates page and apply it to the DP in the System | Administration | Settings page
Generating a CSR
You can use the OpenSSL utility to generate a CSR file and private key. To do so, you will need the following:
-
Access to a Linux or Windows host that is not in your Stellar Cyber cluster.
-
The OpenSSL utility installed on the host. You can download OpenSSL from the following link:
https://wiki.openssl.org/index.php/Binaries
Make sure you save the private key file in a safe place. You'll need it when you upload the certificate to Stellar Cyber in Managing Certificates.
The CSR and private key must be generated without a password or encryption.
Generating the CSR in Linux
Generate the CSR in Linux by opening a command line session with the host (SSH or local) and issuing the following command:
openssl req -new -newkey rsa:2048 -nodes -keyout <yourdomain>.key -out <yourdomain>.csr
This OpenSSL command generates a 2048-bit RSA private key and CSR:
-
The
-nodesargument specifies that the created private key file is not encrypted. -
The
<yourdomain>.keyis the path and filename to your private key file. -
The
<yourdomain>.csris the path and filename to the created certificate signing request.
Generating the CSR in Windows
Generate the CSR in Windows by opening a command prompt window on the host (CMD.exe) and running the following commands:
-
Change directories to the OpenSSL directory:
cd \OpenSSL-Win32
-
Generate the private key:
openssl genrsa -out private-key.key 2048
-
Generate the CSR:
openssl req -new -key private-key.key -out csr.txt
Using the CSR to Obtain a Certificate from your Service Provider
Once you've generated the CSR file, you can take the entirety of its text and paste it into the appropriate field of your service provider's SSL certificate enrollment form. Download the resulting certificate in PEM format.
The exact instructions vary depending on your service provider. As a convenience, here are the instructions for GoDaddy.
Uploading and Applying the Certificate in Stellar Cyber
Once you've retrieved the certificate from your service provider, you can use it to secure the Stellar Cyber user interface as follows:
-
Upload the certificate to Stellar Cyber in the Settings | Administration | Certificates page.
-
Apply the certificate to the DP using the CA Certificate entry in the Data Processor section of the System | Administration | Settings page.
Using the Certificate with TLS-Enabled Log Sources 
You can also use a certificate obtained from your service provider to secure communications with TLS-enabled log sources. This is an alternative to the self-signed certificate used for this purpose in previous releases and is useful in situations where a vendor's deployment does not trust the self-signed certificate provided by Stellar Cyber (for example, Palo Alto Cortex).
Use the following steps:
-
Upload the certificate to Stellar Cyber in the Settings | Administration | Certificates page.
-
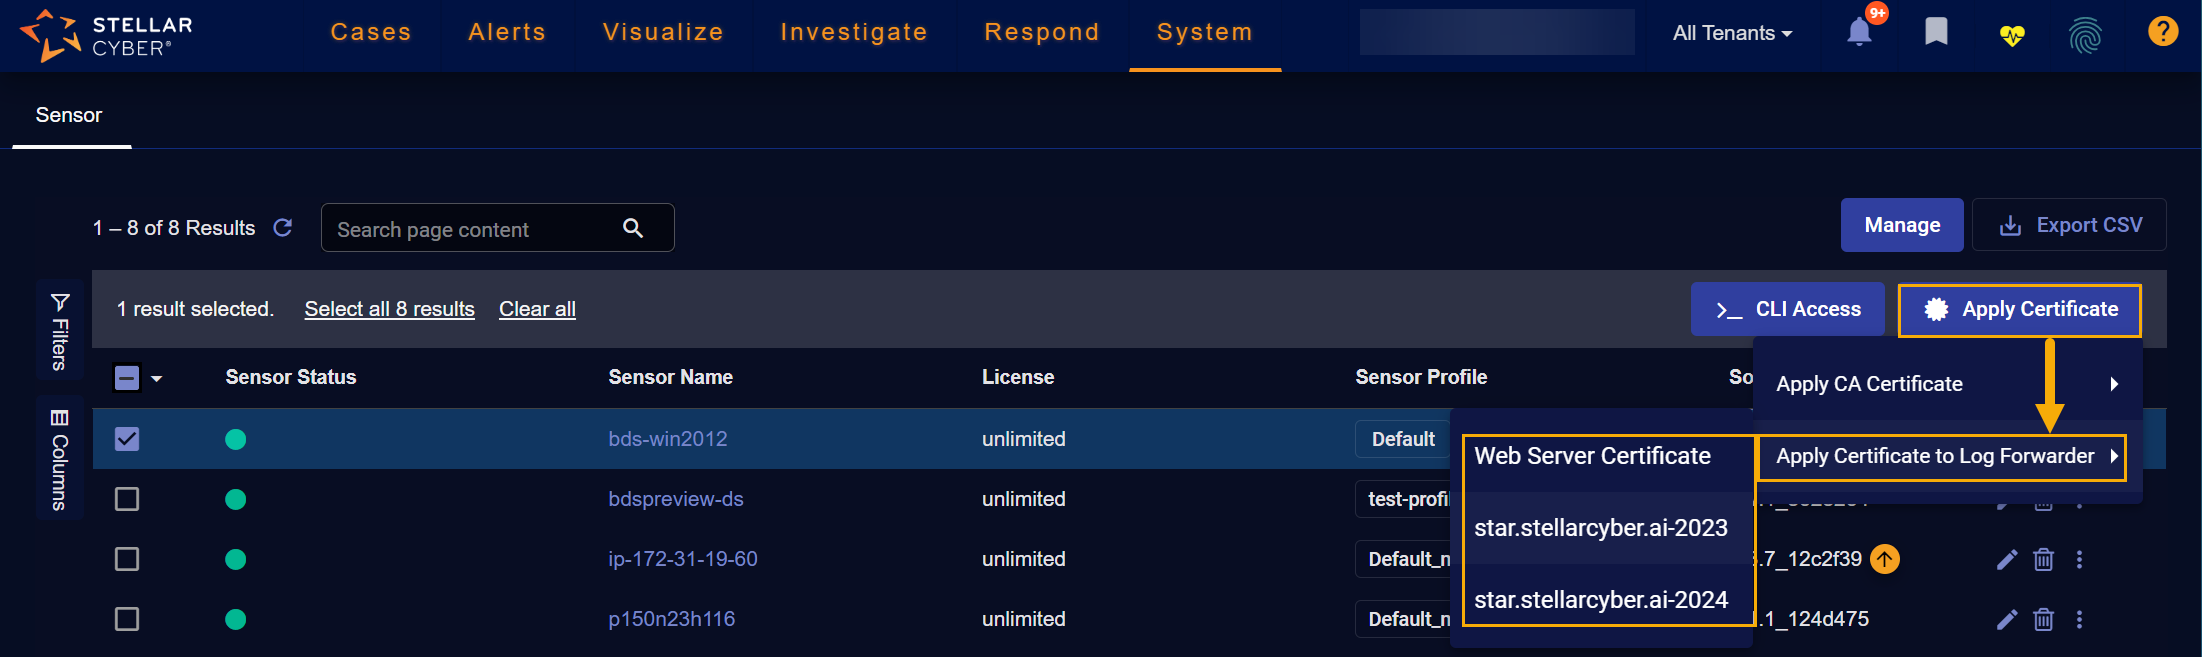
Select the sensor to which you want to apply the certificate by checking its box in the System | Collection | Sensors list.
-
Apply the certificate to a sensor using the Apply Certificate | Apply Certificate to Log Forwarder button in the System | Collection | Sensors list. The interface lists all server certificates that have been uploaded in the Certificates page.

The user interface does not let you apply a certificate to a log forwarder on a Server Sensor.
In response, the selected sensor uses the selected certificate as the TLS certificate for all parser ports on the selected sensor, including those configured in the System | Collection | Log Sources page.
