Managing Scheduled Reports
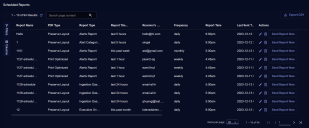
Stellar Cyber can automatically run reports and email those to the configured recipients. Any number of scheduled reports can be active in the system. To view scheduled reports, navigate to the Respond | Scheduled Reports page.
The columns of the table include:
-
Report Name—The name of the report
-
PDF Type—The type of PDF
-
Report Type—This field is automatically populated for reports from one of the pre-defined report tabs. For Custom reports, this field is the same value as the Report Name and cannot be modified.
-
Report Time Interval—The interval of time for which the report is scheduled
-
Receiver's Email—Where the report will be sent when run
-
Frequency—How often the report is run
-
Report Time—The time of day the report is run
-
Last Time Sent—The most recent time that the report was run
-
Sent Status—The result of the report run
-
Send CSV—Indicates whether a CSV file was sent
-
Tenant—The tenant for which the report was run
You can:
-
Export the list of reports.
-
Click
 to edit the scheduled report. The Schedule a Report screen appears. From here, can change a number of the report settings.
Note: You cannot modify the Report Name or Report Type.
-
Click
 to delete the schedule for that report. The original report is not deleted, just the schedule.
 -
Click Send Report Now to immediately run the report and send it to the recipients.
Troubleshooting Emailed Reports
If you are having trouble finding emailed reports in the recipient's email, try checking the Spam folder. If you do find the report there, you may need to enable DKIM for the sending account configured in the System | Mail Server page. Certain mail systems (Gmail, for example) automatically mark emails sent without DKIM enabled as spam.

