Virtual Appliance Sizing Specifications
This article describes the resources required for the successful installation and operation of Stellar Cyber virtual appliances.
Stellar Cyber Virtual 50 Sizing Specifications
You can install the Stellar Cyber Platform as a Virtual 50 appliance (All-In-One) on a VM. The VM must have at least:
| Component | Specification |
|---|---|
|
Virtual Cores |
16 (verified on Xeon Gold processors @ 2.10 GHz) |
|
RAM (GB) |
128 |
|
OS SSD Disk Space (GB) |
500 |
|
Data Lake SSD Disk Space (TB) |
2 |
|
Network Interfaces |
1 x 1 GB |
You can also install the Stellar Cyber Platform on a dedicated VMware ESXi server with support for up to 300GB of daily ingestion. In this model, you install as an integrated DP, with separate VMs for the DA and DL.
Sensor Specifications
You can install device and server (agent) sensors. Device Sensors install as dedicated VMs with Stellar Cyber software pre-installed, while Server Sensors install as applications in an existing VM (Linux or Windows) whose workload you want to monitor.
Previous releases provided a variety of different types of device sensors, including Network, Security, and Modular. Going forward, the only type of device sensor is Modular. You can use the Modular Sensor Profile to enable whatever sensor features you like, creating the same functionality provided by the different sensor types in previous releases.
See the following sections for details:
Provision Sufficient Resources for Virtual Sensors!
In order to guarantee the performance of your virtual sensors, you must provision them according to the system requirements for CPUs and memory in the sections that follow. For hypervisors that allow it, you must reserve resources using the procedure below.
In addition, pay attention to the clock speed for provisioned processors. Stellar Cyber validates sensor installations on processors @ 2.10 GHz.
Other hypervisors may provide their own tools for reserving resources. Refer to your hypervisor's documentation for details. In general, Stellar Cyber recommends reserving resources wherever possible to guarantee sensor performance.
Note that Stellar Cyber recommends using the Thick Provision option when creating the virtual machine to maximize disk I/O rates.
To reserve resources in a VMware environment:
-
Open the vSphere Client and navigate to the VMs and Templates view.
-
Make sure the VM whose provisioning you want to change is shut down. You can only change CPUs and memory for VMs that are shut down.
-
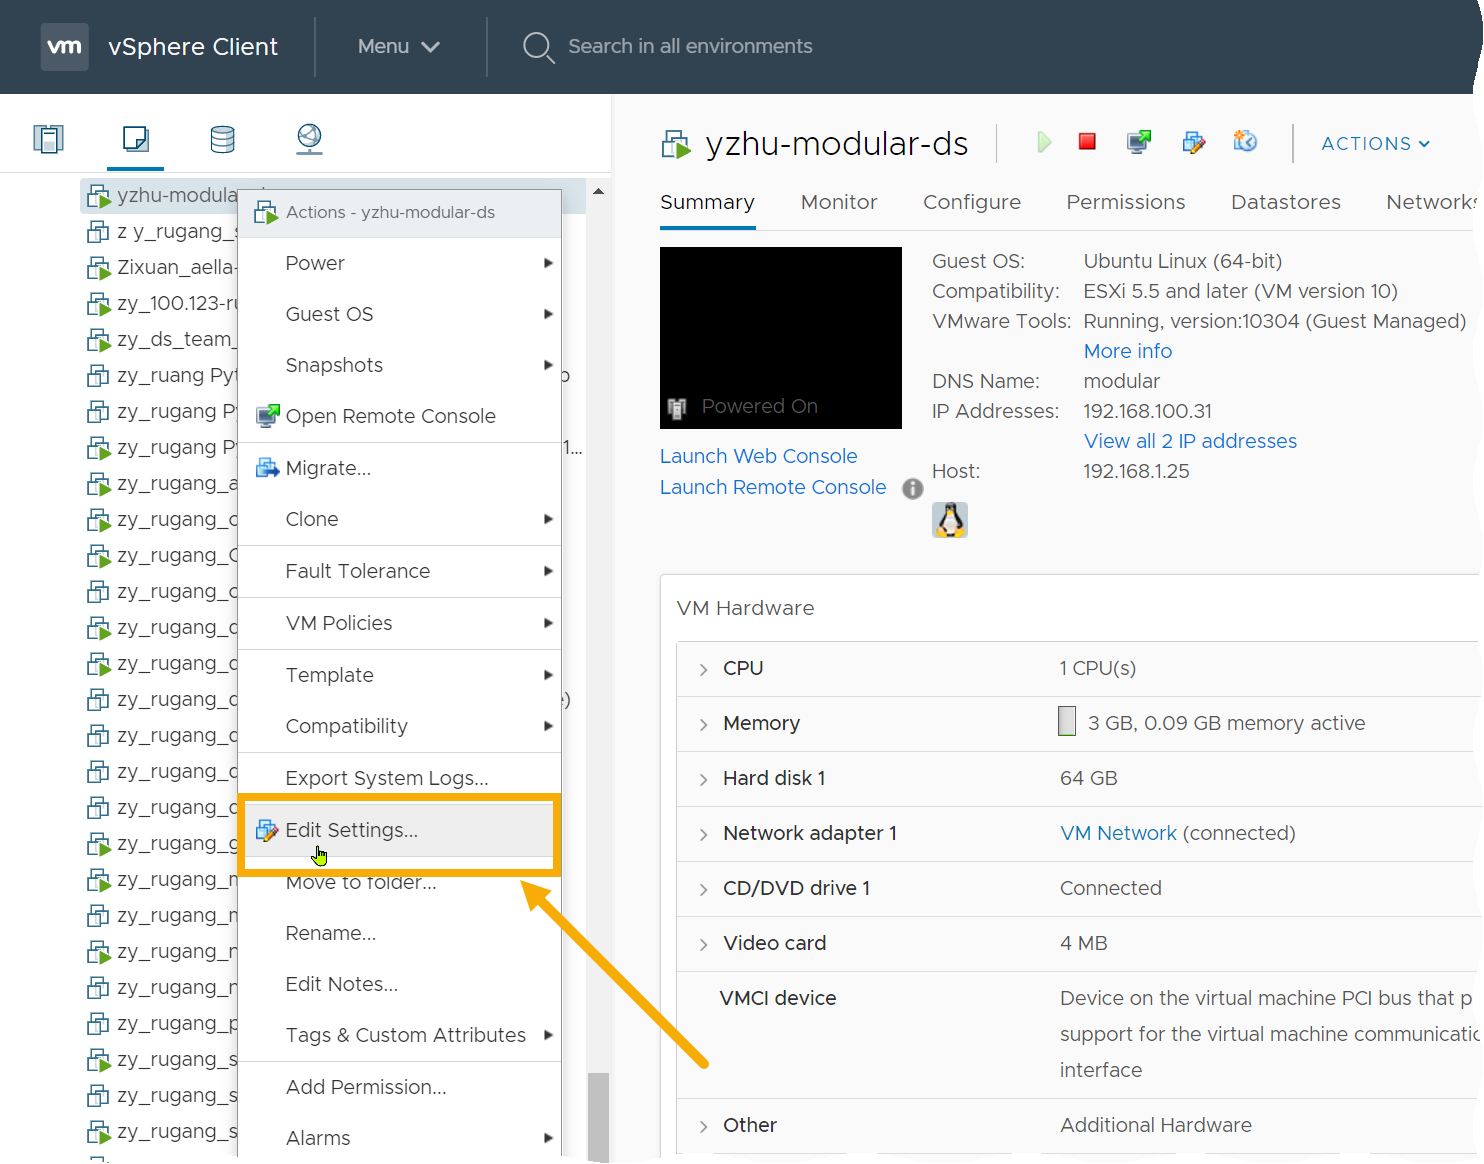
Right-click the VM for the Stellar Cyber sensor whose resources you want to reserve and choose Edit Settings from the menu that appears.
The Edit Settings dialog box appears.
-
Cascade open the CPU entry and set the CPU value to the required amount for the features you are enabling.
-
Next, you'll reserve CPU resources. You do this differently depending on whether hyperthreading is enabled on the host server. The table below summarizes the calculations you make depending on whether or not hyperthreading is enabled on the ESXi host:
Hyperthreading Enabled on ESXi Host?
CPU Reservation Calculation
Hyperthreading Enabled (most common scenario) (Number of CPUs Provisioned for VM) x (ESXi Host CPU Speed in Hz) / 2 Hyperthreading Not Enabled (Number of CPUs Provisioned for VM) x (ESXi Host CPU Speed in Hz) Examples:
The following examples illustrate sample CPU reservation calculations for a sensor VM with 16 CPUs provisioned in different ESXi environments:
-
Hyperthreading Enabled, 96.8 GHz Capacity
-
CPU Capacity – 96.8 GHz (reported in Reservation dropdown in Edit Settings dialog box)
-
Logical Processors – 88
-
Processor type – Intel(R) Xeon(R) CPU ED-2696 v4 @ 2.20 GHz
-
Sockets – 2
-
Cores per socket – (blank)
In this example, we use the following generic calculation for scenarios with hyperthreading enabled:
(Number of CPUs Provisioned for VM) x (ESXi Host CPU Speed in Hz) / 2
We will provision 16 CPUs and fill in the variables for our example as follows:
(16 CPUs) x (2.20 GHz/CPU) / 2 = 17.6 GHz
-
-
Hyperthreading Disabled, 96.8 GHz Capacity
- CPU Capacity – 96.8 GHz (reported in Reservation dropdown in Edit Settings dialog box)
-
Logical Processors – 44
-
Processor type – Intel(R) Xeon(R) CPU ED-2696 v4 @ 2.20 GHz
-
Sockets – 2
-
Cores per socket – (blank)
In this example, we use the following generic calculation for scenarios with hyperthreading disabled:
(Number of CPUs Provisioned for VM) x (ESXi Host CPU Speed in Hz)
We will provision 16 CPUs and fill in the variables for our example as follows:
(16 CPUs) x (2.20 GHz/CPU) = 35.2 GHz
-
Hyperthreading Enabled, 33.6 GHz Capacity
- CPU Capacity – 33.6 GHz (reported in Reservation dropdown in Edit Settings dialog box). Two sockets multiplied by six cores/socket multiplied by 2.80 GHz per core.
-
Logical Processors – 24
-
Processor type – Intel(R) Xeon(R) CPU X5660 @2.80GHz
-
Sockets – 2
-
Cores per socket – 6
In this example, we use the following generic calculation for scenarios with hyperthreading enabled:
(Number of CPUs Provisioned for VM) x (ESXi Host CPU Speed in Hz) / 2
We will provision 16 CPUs and fill in the variables for our example as follows:
(16 CPUs) x (2.80 GHz/CPU) / 2 = 22.4 GHz
Note that if you used the wrong calculation in this scenario and did not divide by two, the resulting value of 16 CPU x 2.80 GHz = 44.8 GHz would exceed the total CPU capacity of 33.6 GHz. Also, if you reserved the maximum available capacity of 33.6 GHz, you would commit all of the host's CPU resources to just this machine. This is why it's important to use the correct calculation for your host when reserving CPU resources.
-
-
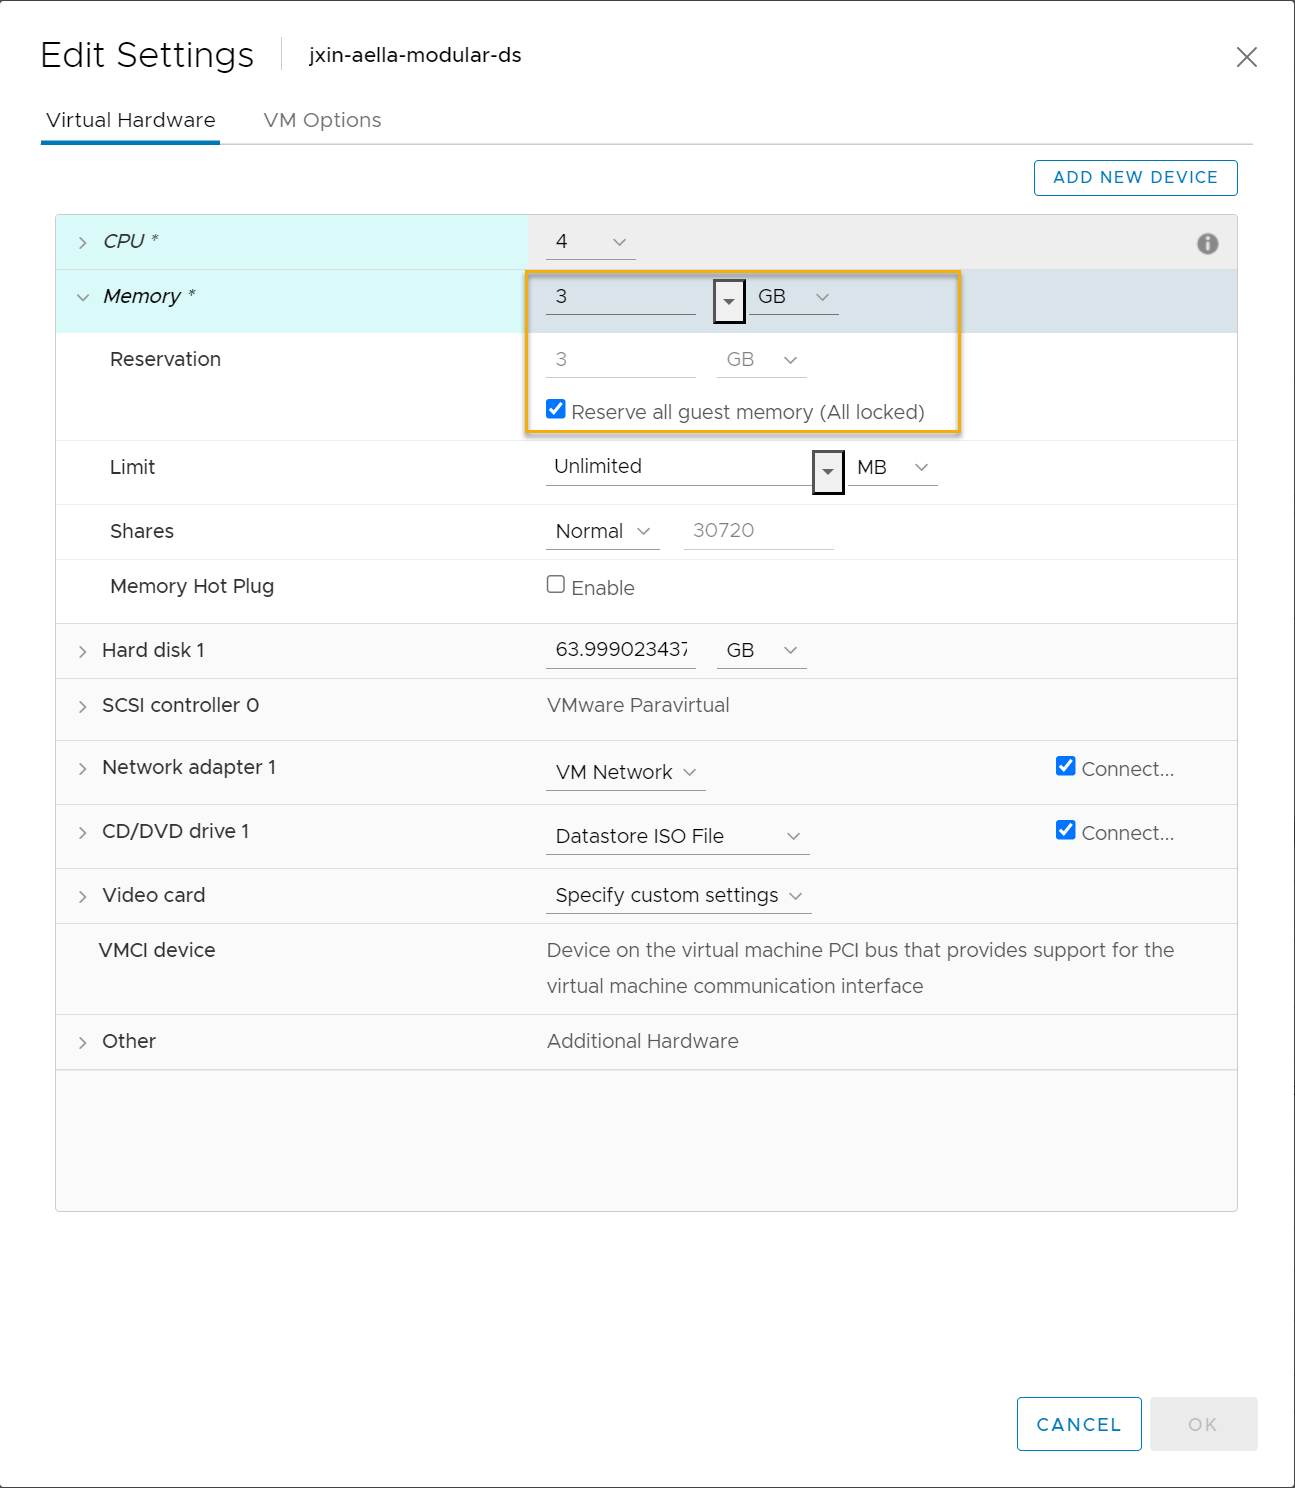
Cascade open the Memory entry and set it to the required amount for the features you are enabling.
-
Check the Reserve all guest memory (All locked) option to reserve the full amount of memory for the sensor VM's usage.

-
Click OK to apply your changes to the VM.
-
Power on the VM.
Refer to the VMware documentation for a general discussion of resource reservation as well as a set of suggested best practices for reserving resources.
Modular Sensor Specifications
A modular sensor lets you easily add the features you like to your sensor. This helps simplify your deployment and lets you manage the VM requirements for the sensors based on the modular features they use.
Modular Sensors always include log ingestion. From there, you can enable different features as part of your modular sensor profile:
-
Enable the Network Traffic feature to monitor the virtual environment, the physical environment if connected to the span port of a physical switch, or the LAN segment via a mirror port on a switch. The sensor monitors network and server response times and can identify applications.
The sensor converts that information to metadata and forwards it to the DP as Interflow. The DP can then provide security, DDoS, and breach attempt detections.
-
Enable the Sandbox and IDS features to improve your security posture:
- Sandbox lets you detect malware in files and network traffic through Stellar Cyber's integrated cloud service and also provides anti-virus services.
- IDS lets you detect intrusion attempts using both files and network traffic.
The modular sensor VM must meet the minimum specifications in the table below:
| Modular Features | Virtual Cores | RAM (GB) | SSD (GB) | Workers |
|---|---|---|---|---|
| Log forwarder (500 events/s) | 1 | 3 | 64 | 1 |
| Log forwarder and aggregator (500 events/s; 100 Mbps traffic) | 1 | 3 | 64 | 1 |
The OVA/VHD files distributed for Modular Sensor installation in VMware/Hyper-V environments provision the VM with
As a rule of thumb, Stellar Cyber recommends that you provision at least 1.5 times as much memory as the number of CPU cores to ensure stable performance. So, for example, if you provision 8 CPUs, you should provision at least 8 x 1.5 = 12 GB of memory.
| CPU | RAM (GB) | Disk (GB) |
Log Collector |
Network Traffic |
IDS |
Sandbox |
Tenable |
|---|---|---|---|---|---|---|---|
| 1 | 3 | 23 | ü | – | – | – | – |
| 2 | 3 | 28 | ü | ü | – | – | – |
| 4 | 6 | 50 | ü | ü | ü | – | – |
| 4 | 6 | 50 | ü | ü | – | ü | – |
| 4 | 6 | 50 | ü | ü | ü | ü | – |
| 2 | 4 | 33 | ü | – | – | – | ü |
| 3 | 5 | 38 | ü | ü | – | – | ü |
|
4 |
8 |
60 |
ü | ü | ü | – | ü |
|
4 |
8 |
60 |
ü | ü | – | ü | ü |
|
4 |
8 |
60 |
ü | ü | ü | ü | ü |
Keep in mind the following:
-
Log Collector and Log Forwarder are always enabled in Modular Sensor Profiles.
-
Stellar Cyber limits the number of log sources you can point at a given sensor as follows:
-
Sensors with 8 GB or less of memory accept a maximum of 100 log sources.
-
Sensors with more than 8 GB of memory accept a maximum of 200 log sources.
Log sources beyond the limit are aggregated under the special source IP address of 0.0.0.0.
-
-
The Sandbox and IDS features can only be enabled if Network Traffic is enabled.
-
Modular Sensor throughput is as follows:
Component Virtual Cores (reserved) 4
8
12 24 RAM (GB) (reserved) 8
16
32 64 Maximum traffic inspection throughput (Mbps)*
(1 or 2 span ports)200
500
1,000 10,000 * Stated specifications support the corresponding maximum network traffic inspection throughput. Performance may vary depending on your environment, configuration, and other variables.
-
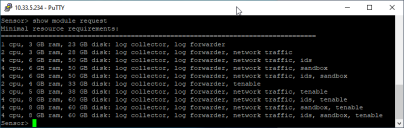
The resources in the table were current at the time of writing. You can always see the most recent recommendations from Stellar Cyber by using the show module request command in the Sensor CLI. For example:
-
You can see which features are currently enabled on a sensor, as well as its current provisioning by using the show module command in the Sensor CLI. For example:


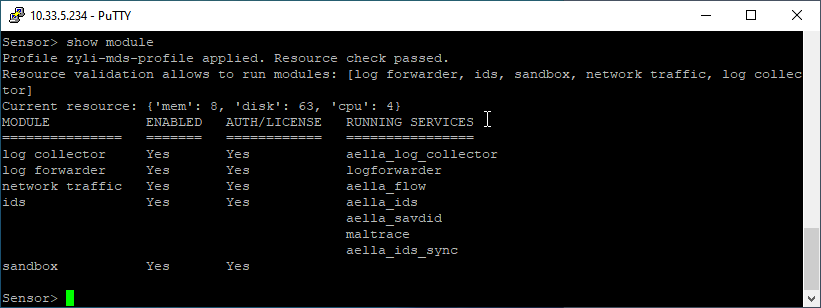
Automatic Resource Checking
When you apply a Modular Sensor Profile, Stellar Cyber automatically checks the resources provisioned for the target sensor and informs you whether they are sufficient to support the features enabled in the profile. You can also see the results in the show module command listed above – the output of the command reports both the name of the Modular Sensor Profile applied and whether the resource checks passed.
If the resource checks do not pass, Stellar Cyber informs you of the issue and displays the sensor in the list with a visible warning of the problem. It does not enable the sensor features until the minimum specifications are met.
Linux Server Sensor Specifications
The Linux Server Sensor uses 5% of the host server's resources, including each CPU core, so the VM must have at least:
| Component | Specification |
|---|---|
| Host CPU | Xeon Core 2 virtual cores (2.0 GHz or more) |
| Host RAM (GB) | 12 |
| Host SSD (GB) | 128 |
Windows Server Sensor Specifications
The Windows host into which the Windows Server Sensor is installed must have at least:
| Component | Specification |
|---|---|
| Host CPU | Xeon Core 2 virtual cores (2.0 GHz or more) |
| Host RAM (GB) | 8 |
| Host SSD (GB) | 128 |
| OS | Windows Server 2008 R2 (or later) |
Enabling SSSE3
Sensors installed on Linux hosts with KVM hypervisors must have SSSE3 enabled for their vCPUs in order to collect network packets (including packets received from a mirror port) and generate Interflow data from them. This is true for both device sensors and server sensors.
SSSE3 is typically supported/enabled for most vCPUs, but may not be for certain legacy AMD vCPUs. See below for instructions on enabling SSSE3.
Similarly, sensors deployed in Hyper-V must have processor compatibility mode disabled to ensure that SSSE3 works correctly.
To enable SSSE3 for a virtual machine:
-
Start the virtual shell (virsh)
-
Type the following command to edit the virtual machine's settings:
edit <virtual_machine_name> -
Locate the <cpu> section. It should appear similar to the following:
Copy<cpu mode='custom' match='exact' check='partial'>
<model fallback='allow'>SandyBridge</model>
......
</cpu> -
Add the following line to the <cpu> section:
<feature policy='require' name='ssse3'/>When you are done, the <cpu> section should appear similar to the following:
Copy<cpu mode='custom' match='exact' check='partial'>
<model fallback='allow'>SandyBridge</model>
<feature policy='require' name='ssse3'/>
...........
</cpu> -
Save changes to the virtual machine and exist virsh.
-
Run the following command:
virsh define /etc/libvirt/qemu/<virtual_machine_name>.xmlEach virtual machine has a configuration .xml file. Typically, these files are stored under /etc/libvirt/qemu, but the location may be different for your system.
-
Stop and start the virtual machine in virsh.
