Upgrading Data Processor Software
You must have Root scope to use this feature.
Upgrading Stellar Cyber regularly lets you get new features, new detections, and general improvements. You can upgrade while the system is operating with minimal disruption of services.
There are two general upgrade methods:
- Online Upgrade downloads new software images from the upgrade server on the internet. This is the easiest method.
- Offline Upgrade uploads new software images from the local file system. This is useful when Stellar Cyber does not have access to the internet.
Stellar Cyber can only restore configurations for the currently running version. After you upgrade, you cannot restore a configuration from the previous software version.
This upgrade process refers to the upgrade of the Stellar Cyber Data Processor. To upgrade sensors, see the Sensor Overview page.
Pre-Upgrade Check
We strongly recommend, whether you do an online or offline upgrade, that you run the pre-upgrade check. To run the pre-upgrade check, click Start Check.
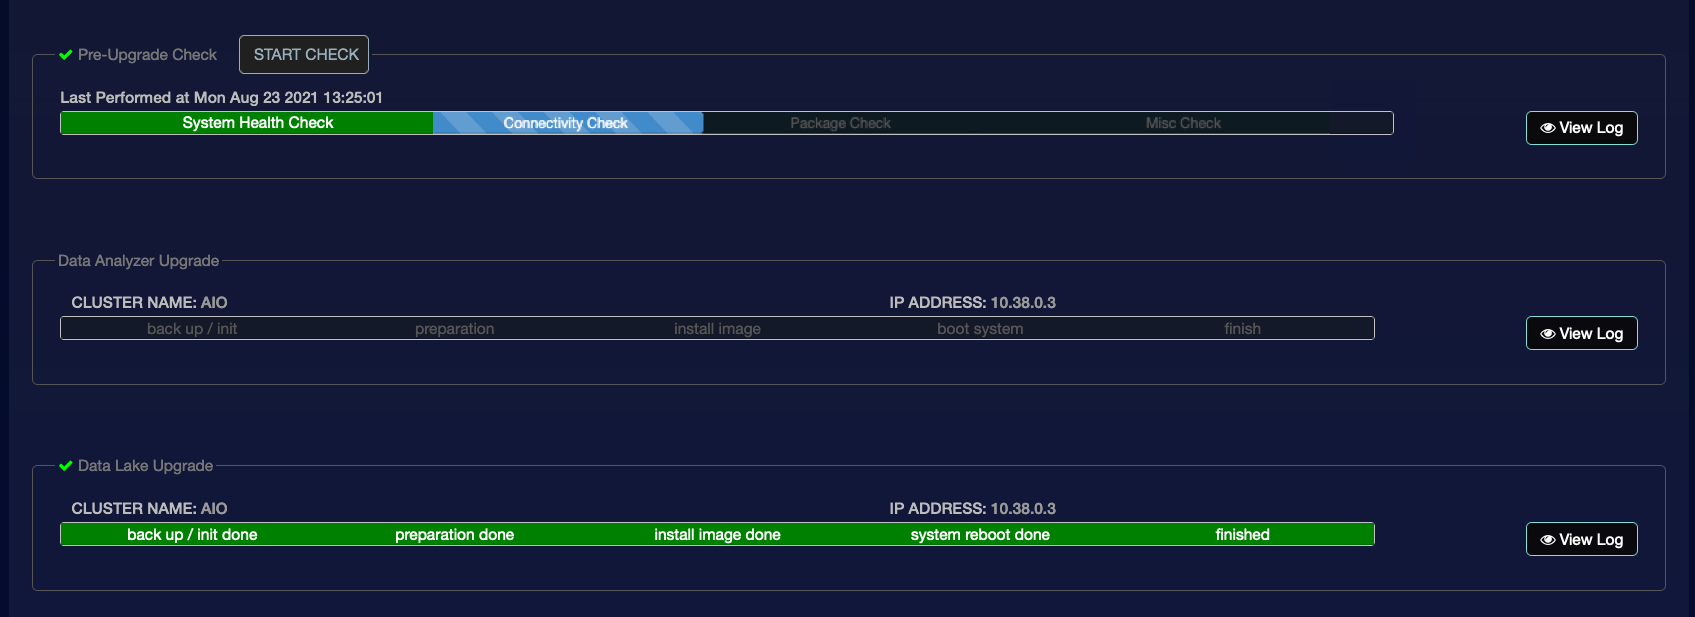
The check runs automatically and updates status in the progress bar. It performs a system health check, connectivity check, package check, and then checks several miscellaneous things. It specifically checks:
- Data lake connectivity
- Data analyzer connectivity
- Existence of the correct package
- Connectivity to the repository for each node (ignored for offline upgrades)
- Connectivity of the
apt-getcommand for each node (ignored for offline upgrades) - Health of external storage
- Data backup schedule (pre-check does not fail if there is a backup scheduled, but recommends rescheduling)
If the pre-check fails, the progress bar indicates the area that failed.
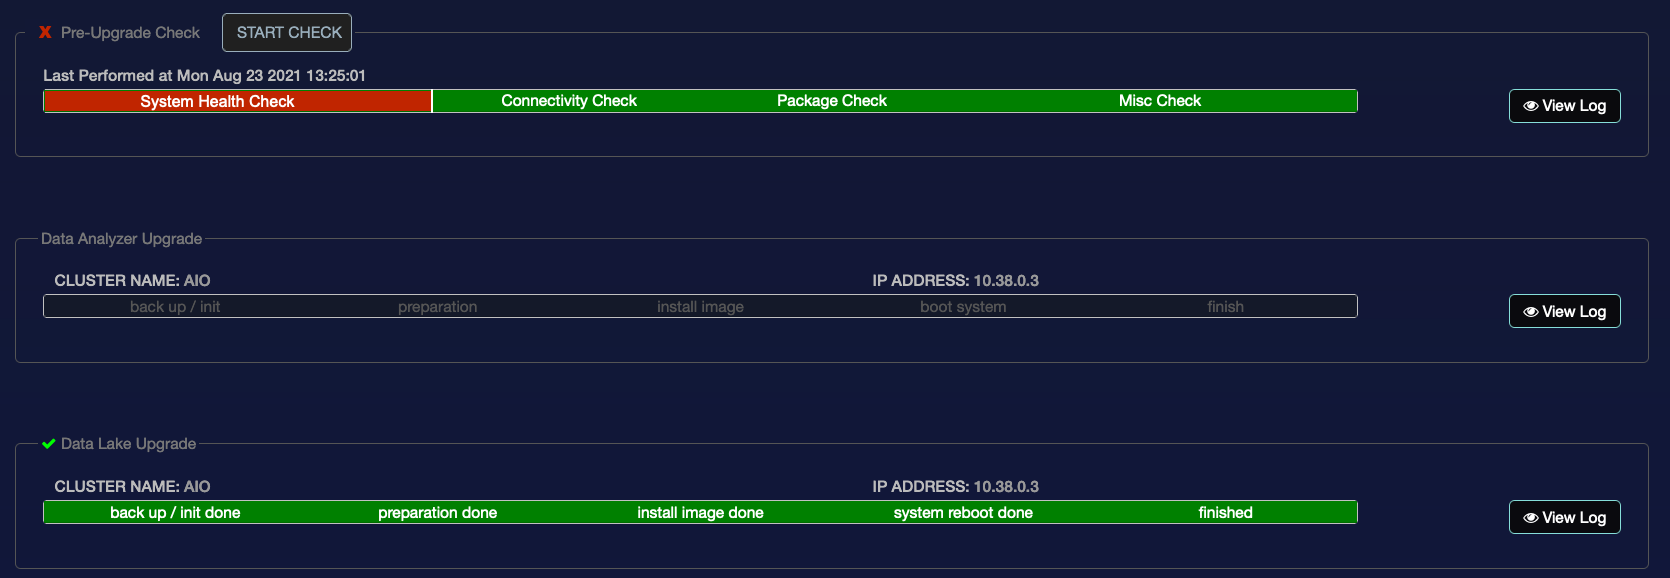
Click View Log for details on why the check failed.
Online Upgrade
If your DP has access to the internet, you can perform an online upgrade:
-
Click System | Administration | Software Upgrade. The current software version is displayed.

The available versions appear, updated automatically by Stellar Cyber.
- Scroll down and click Start Check for the Pre-Upgrade Check.
- When the check finishes, scroll back up and choose a version.
- Click View Release Notes to see what's in the release.
- Click Start Upgrade. A confirmation dialog appears.
- Click Yes. The upgrade starts.
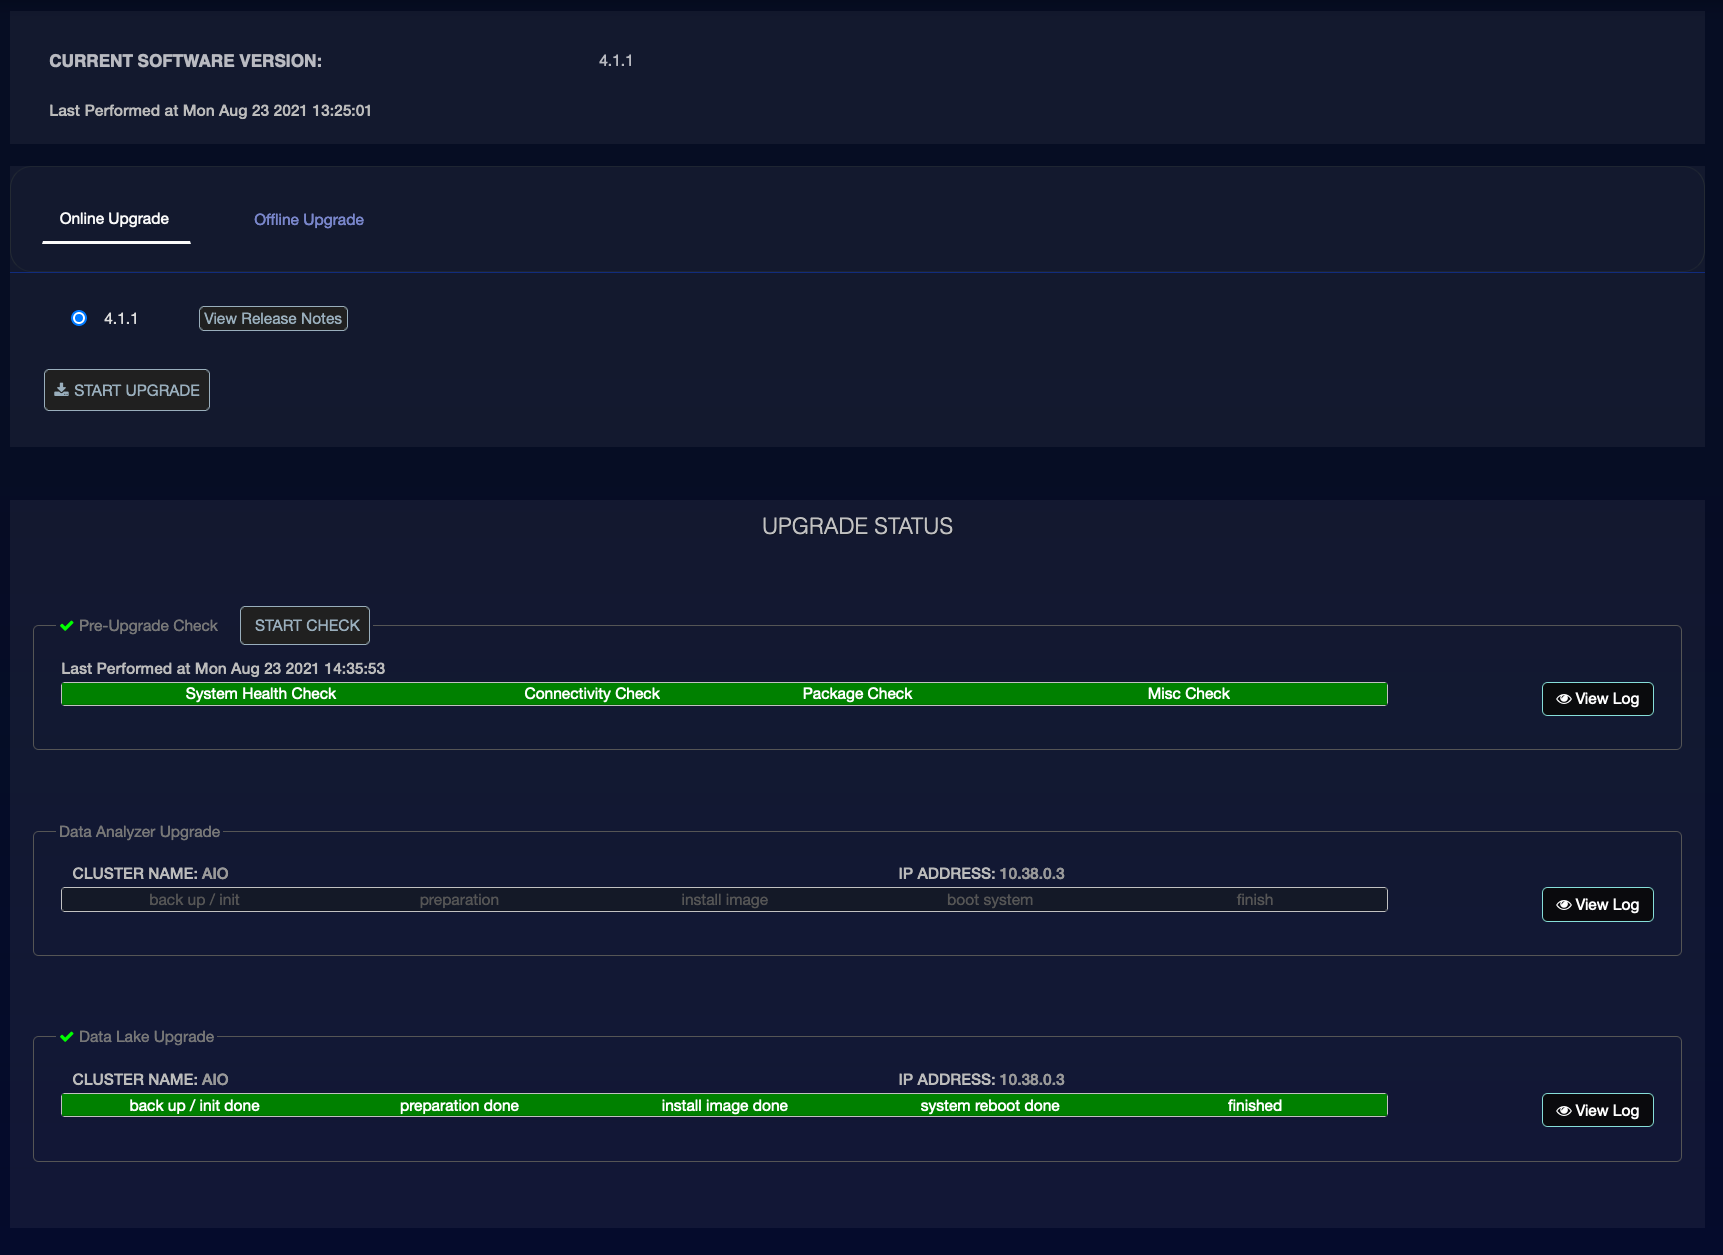
The Upgrade Status section tracks the upgrade. Click View Log for details.
When the upgrade finishes, all users are logged out and Stellar Cyber services restart.
Offline Upgrade
To perform an offline upgrade, you must download the image to a server that is accessible from the DP and supports SCP over SSH. Use the following procedure to perform an offline upgrade:
-
Contact Stellar Cyber technical support and acquire the upgrade image.
-
Store the image on an accessible server.
-
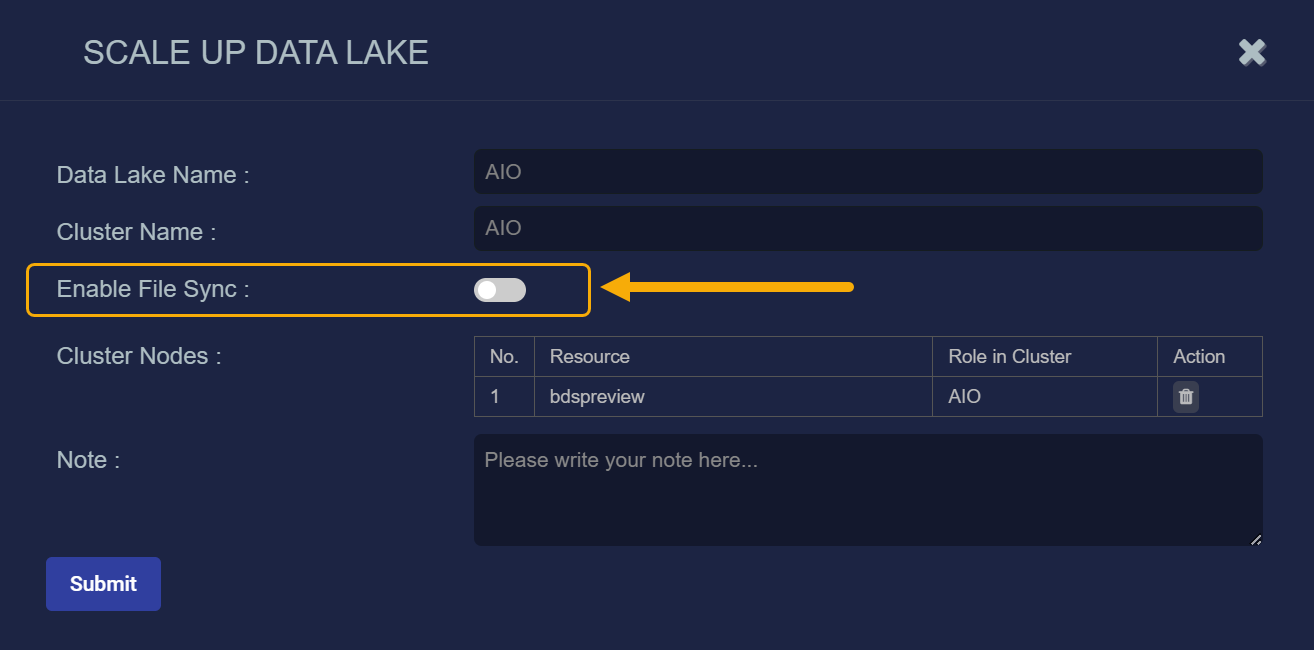
Navigate to System | Data Processor | Data Lake and click the Edit button in the Actions column.
-
Ensure that Enable File Sync is toggled off, as in the image below, and click Submit.

-
Click System | Administration | Software Upgrade. The current software version is displayed.
-
Click Offline Upgrade. The Offline Upgrade Package Upload page appears.
-
Scroll down and click Start Check for the Pre-Upgrade Check.
-
When the check finishes, scroll back up and enter the User Name of a user who can access the server hosting the image.
-
Enter the Password for that user.
-
Enter the Host Name of the server. It can be the FQDN or IP address.
-
Enter the Port. By default this is the SSH port.
-
Enter the File Path.
-
Click Start SCP Download. The DP connects to the hosting server and downloads the image.
-
Select the upgrade after the download finishes.
-
Click Start Upgrade. A confirmation dialog appears.
-
Click Yes. The upgrade starts.
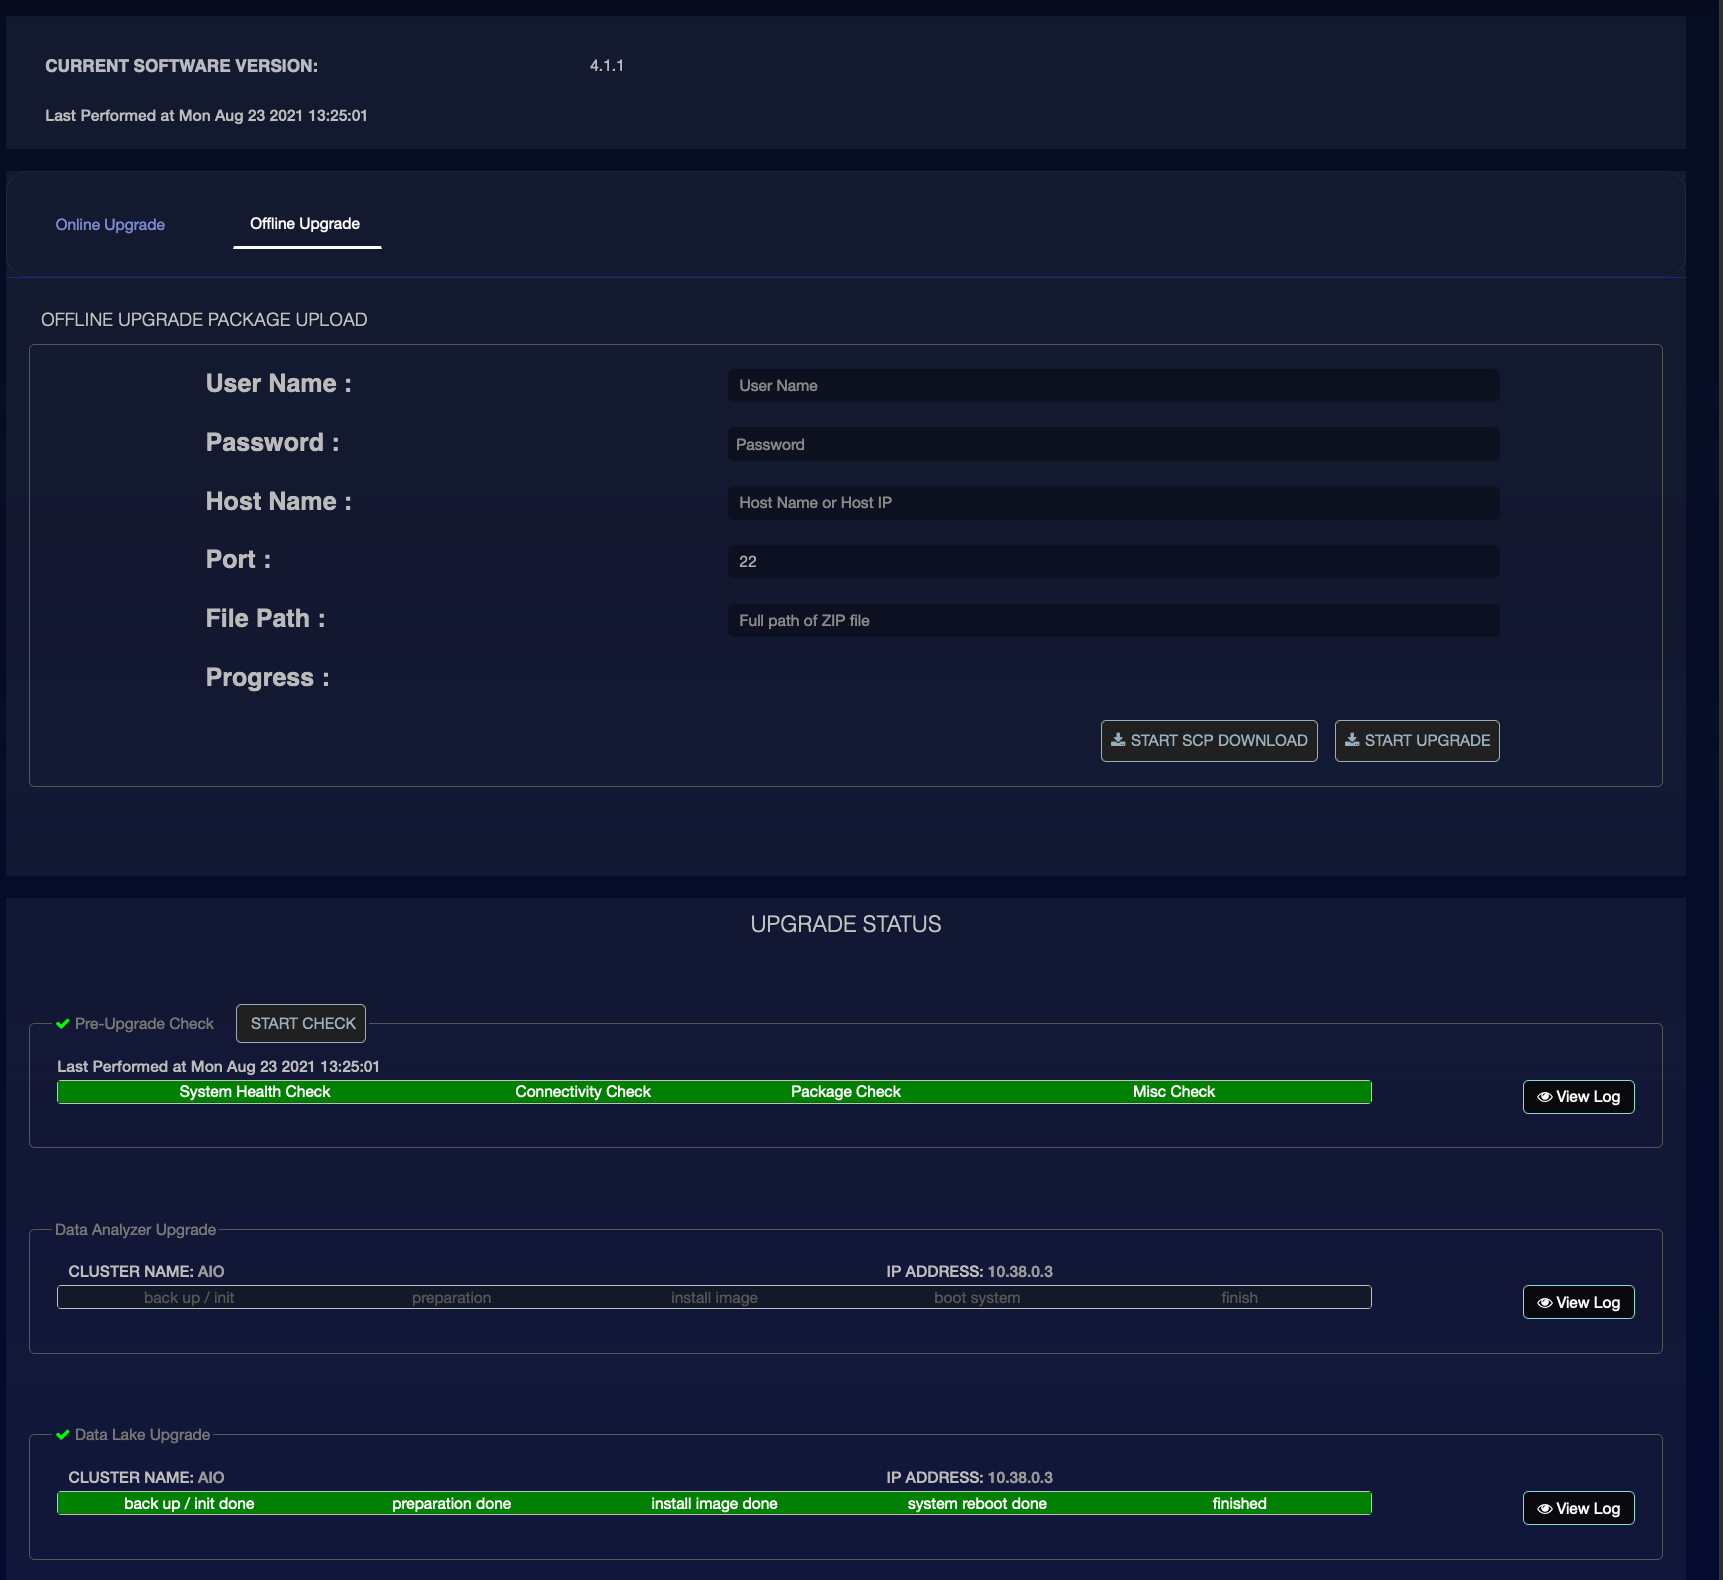
The Upgrade Status section tracks the upgrade. Click View Log for details.
When the upgrade finishes, all users are logged out and Stellar Cyber services restart.
Automatic Rollback
In the unlikely event of an upgrade failure, Stellar Cyber automatically rolls the platform software back to the version that was installed before you started the upgrade process.
Verifying the Upgrade
After upgrading the DP and then the sensors, you can use the following techniques to verify that the upgrade was successful:
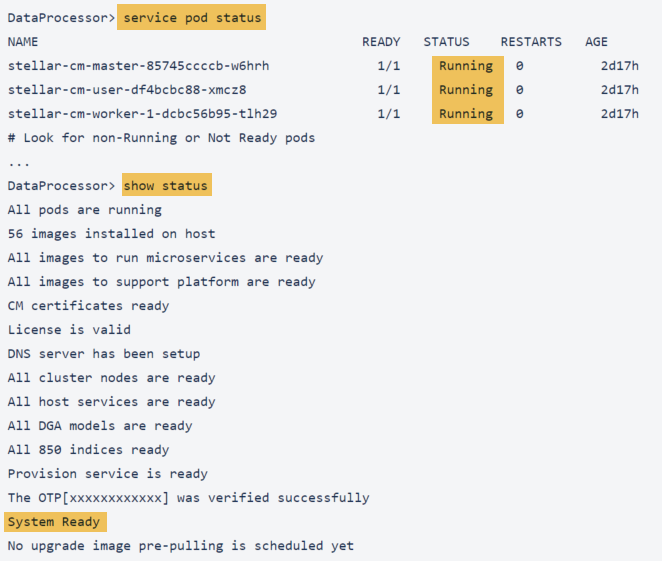
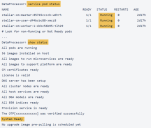
-
Open a SSH connection to the DL-master and run the service pod status and show status commands to ensure that all services are running and the system is ready. For example:
-
Verify that you are able to log in to the Stellar Cyber user interface with existing user accounts.
-
Open the XDR Kill Chain dashboard and verify that the Top Cases and Top Risky Assets lists are populated with current entries.
The XDR Kill Chain dashboard is the default home page. If you changed the home page, you can launch the XDR Kill Chain dashboard from Visualize | Predefined | XDR Kill Chain.
-
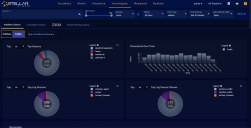
Open the Visualize | Predefined | System Status dashboard and check for any warnings, errors, or red health indicators in the Sensor, Data Analyzer, Data Lake, or Machine Learning sections.
-
Open the Sensor List from System | Collection | Sensors and verify that all sensors have green health indicators in the Status column and show Authorized in the Authorization column.
-
Open the Connector List from System | Integration | Connectors and verify that all connectors show Enabled in the Collect and/or Respond columns.
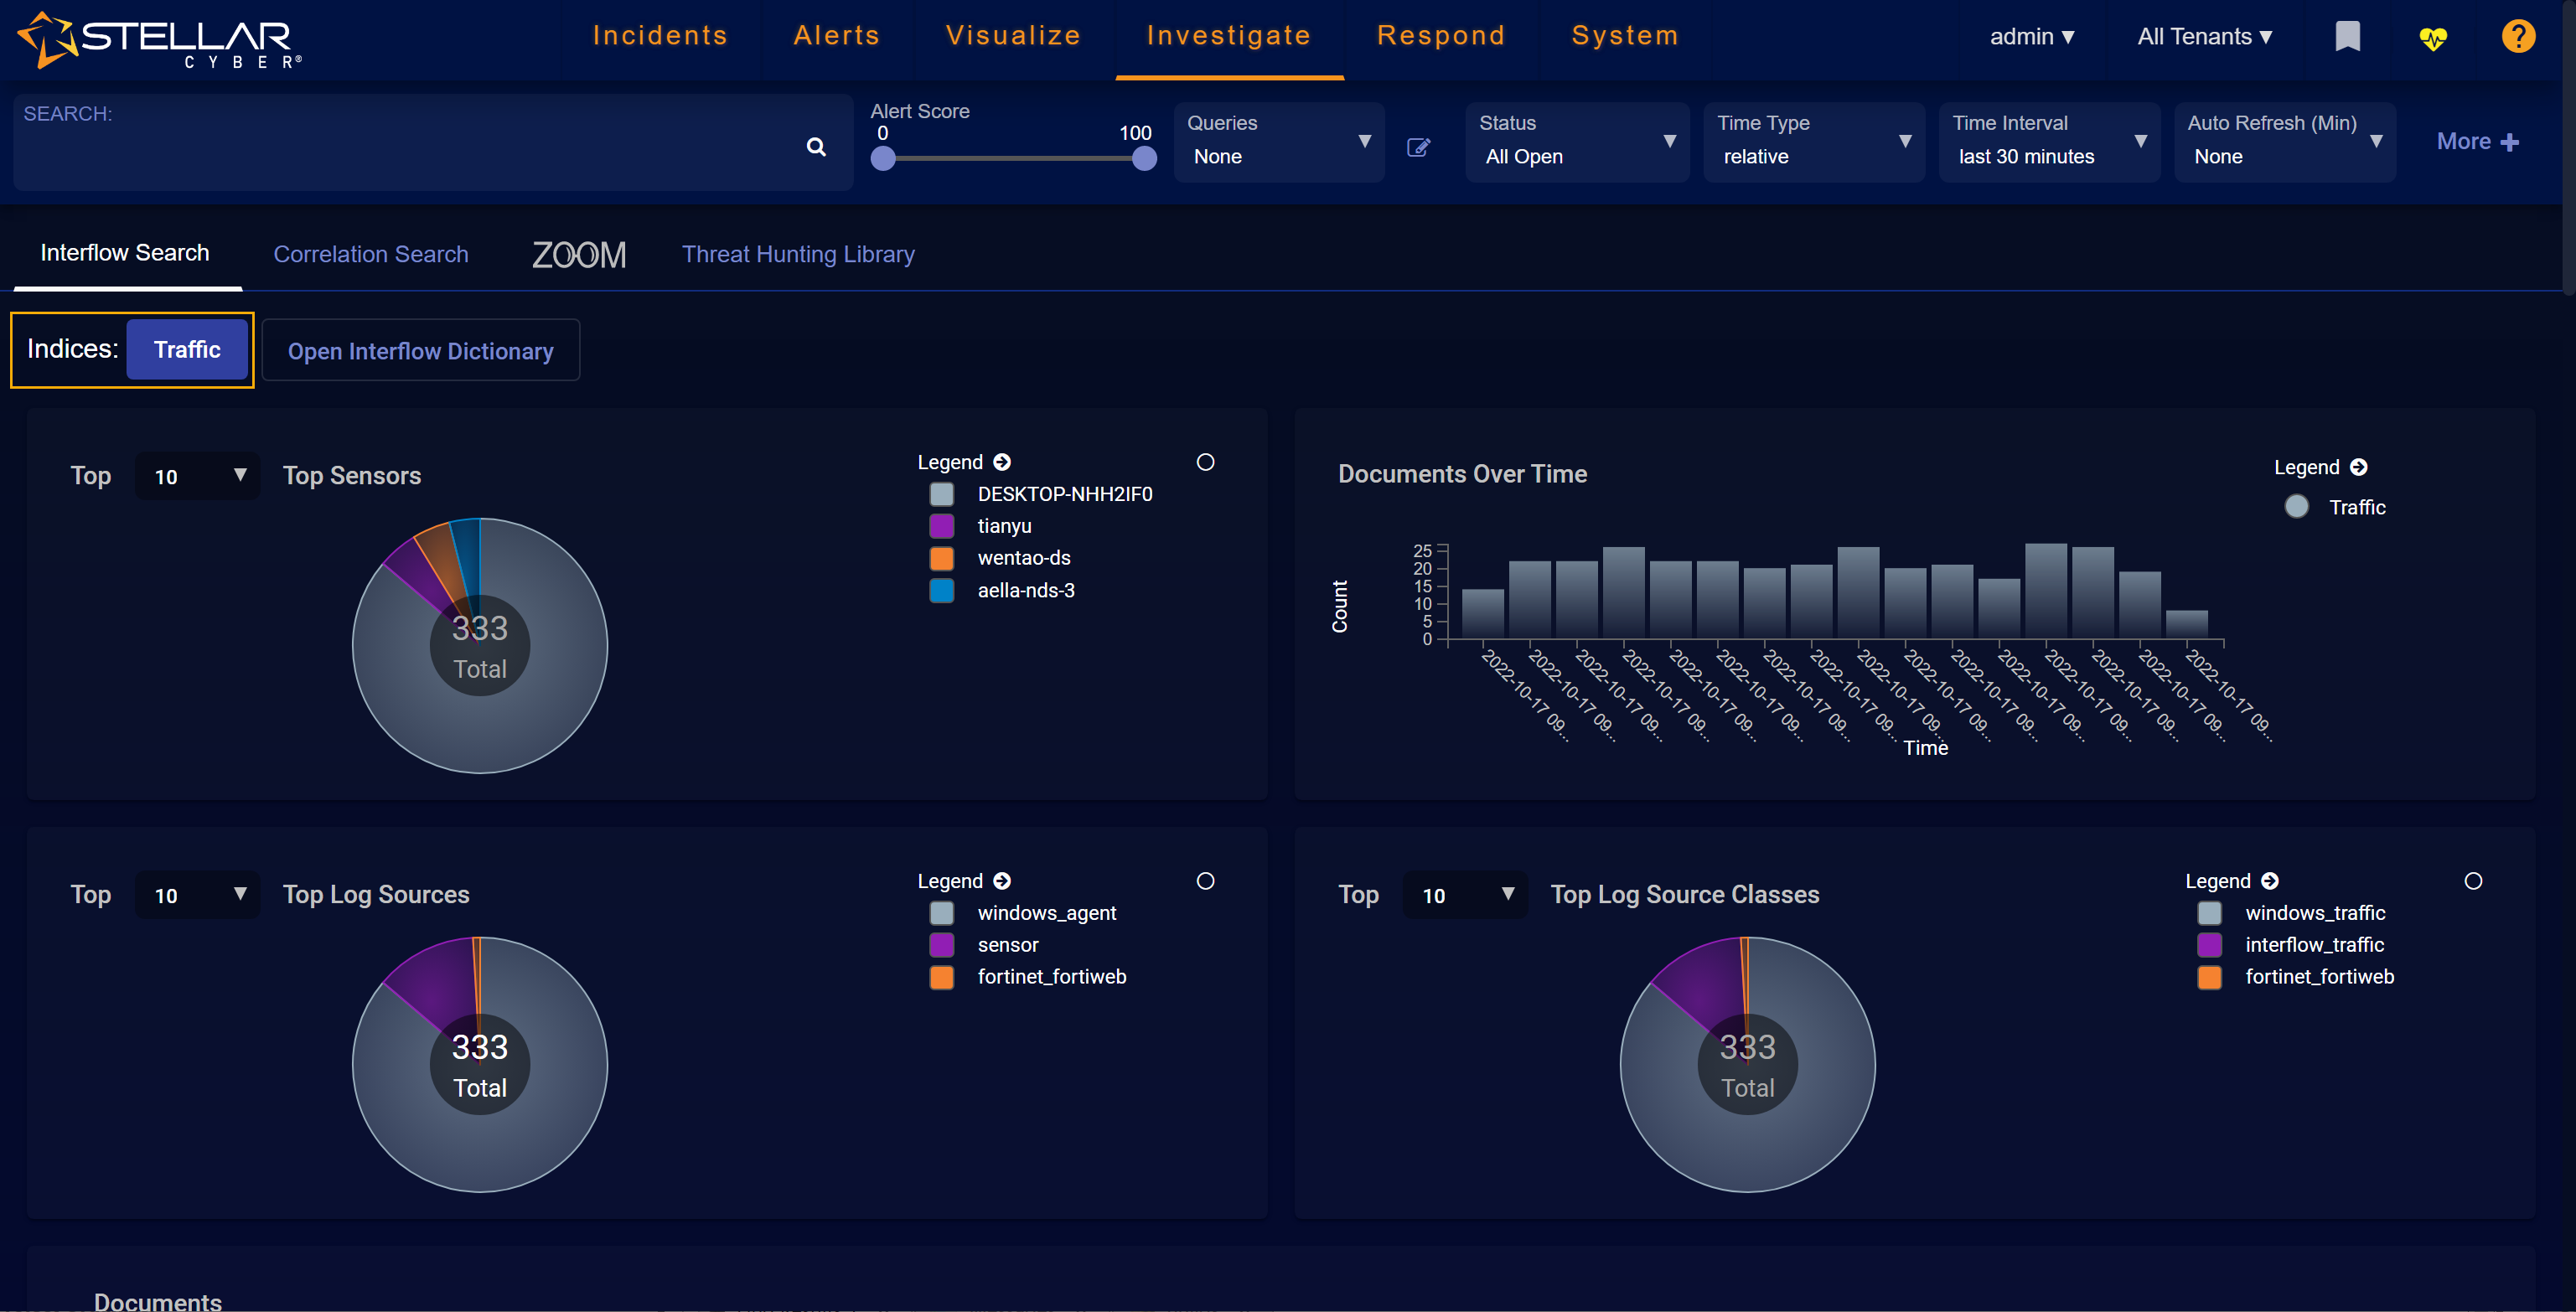
-
Open the Investigate | Threat Hunting page and verify that data is arriving at the DP on all indices. You can change the selected index using the Indices dropdown (set to Traffic in the example below).
-
If you have enabled a Data Sink, use the object storage interface for your sink type to verify that data has been uploaded recently. For example, for an AWS S3 data sink:
$ aws s3 ls <Bucket>/organization=default-organization/index=adr/tenant=<TenantID>/year=2022/month=06/day=16/hour=18/minute=28/
2022-06-16 11:28:22 107406 1b6a2487-3317-4fe9-8ccf-b5c596be983c.gz
...