Configuring Role-Based Access Control
![]() Learn more at Stellar Cyber Academy.
Learn more at Stellar Cyber Academy.
The following link takes you to a course on the Stellar Cyber Academy technical training portal where you can learn more about this topic by watching the suggested lessons.
(2024) ADMIN - Admin Essentials for Tenants Users and System (03h:46m)
Discover how to manage user privileges using role-based access control (RBAC). Configure privilege profiles like Super Admin, Platform Admin, and Security Admin to control access levels within the Stellar Cyber Platform and meet organizational security needs.
Follow a demonstration on configuring RBAC profiles and assigning privilege levels to users. Learn how to apply scopes and roles to provide secure access to tenants while ensuring compliance with organizational policies.
The first time you access a link on the portal during a session, you must log in to access content.
You can use role-based access control (RBAC) to manage access to Stellar Cyber by assigning scopes and privileges to users. Use scope to manage access to tenants. Use privilege to manage access to functions. You assign scope and privilege when adding or editing users.
| Previous Role | Previous Privilege | Current Privilege |
|---|---|---|
| Root | Admin | Super Admin |
| Root | User | User |
| Tenant | Admin | Security Admin |
| Tenant | User | User |
| Partner | Admin | Security Admin |
| Partner | User | User |
Use the options in the System | ORGANIZATION MANAGEMENT | Role-Based Access Control page to perform the following tasks:
- Create or edit privilege profiles
- Delete privilege profiles
- Use Your IdP to Manage RBAC
Creating or Editing a Profile
Scopes are managed and maintained by Stellar Cyber; you cannot create or change scopes.
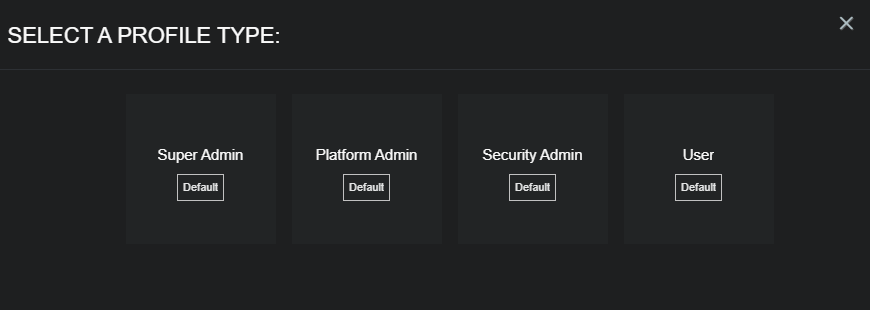
Privileges are managed through profiles, which you can create and change. Stellar Cyber provides four default privilege profile templates (which are marked Default in the SELECT A PROFILE TYPE screen):
-
Super Admin – Provides full access to the system.
-
Platform Admin – Provides full access, except for RBAC and selected system settings (external storage and standby management, for example).
-
Security Admin – Lets you view, edit, and add sensors, recipients, connectors, reports, dashboards, queries, and others but not delete them. View-only access to most system pages.
-
User – Provides view-only access to most system options, including queries.
You can click any of the listed Profile Types to see its associated privileges. Privileges listed with a ü in the display are enabled as part of the corresponding profile while those with an x are disabled. Privileges are nested under the top-level entries in the Profile Configuration page according to their relative position in the user interface.
| User |
Security Admin |
Platform Admin | Super Admin | |
|---|---|---|---|---|
|
View Data Pages XDR Kill Chain Dashboard, Cases, Alerts, Preset/Custom Dashboards/Charts. Not assignable but available to all roles. |
ü | ü | ü | ü |
|
Global Interflow Actions, Alert Filters, Help |
x | ü | ü | ü |
|
Cases Create, Edit |
View only | ü | ü | ü |
|
Alerts View, Create, Edit, Delete |
View only | ü
View, Create, and Edit only. |
ü | ü |
|
Visualize Predefined and Custom Dashboards/Charts |
View only. No add/edit/delete privileges. System Status dashboard not available. | View, create, and edit. No delete privileges for custom dashboards/charts. |
ü | ü |
|
Investigate Threat Hunting, Asset Analytics, User Behavior Analytics, Panoramic |
View only. No add/edit/delete privileges, or asset imports. |
View, add, edit. No asset import, clear CSV import, or delete correlations privileges. Kibana plugin available with Root scope. | ü | ü |
|
Respond Automation, Actions, and Reports/Scheduled Reports |
View only for Reporting, Alerting, and all Response Actions (Firewall, Active Directory, Script, and Endpoint). No add/edit/delete privileges. | View, add, edit. No delete privileges for reports or alerts. | ü | ü |
|
System Collection, Integrations (Connectors, Threat Intelligence, InSyncs), Data Processor, Detections (Detection Management, Exclusions), Configuration, Deployment, Administration, and Certificates |
View only for Collection (Sensors, Sensor Profiles, Receivers, Filters, and Custom Log Parsers), Integrations (Connectors), Tags, and Lookups. No add/edit/delete privileges, most options hidden. |
|
|
ü |
You can use these default profiles as-is and assign them to users, or you can create new, custom profiles based on these templates. You cannot edit the default profiles.
Whether you create a new profile or edit an existing profile, you have the same options for defining privileges.
User Management and RBAC
In general, you can only delete users with a lower-level permission than your own account. This means:
-
Super Admin users can delete users with any permissions except the default Super Admin account and their own account.
-
Platform Admin users can delete Security Admin users and regular Users.
The exception to this rule is Security Admin users. Security Admin users only have View permissions for users by default. They do not have add, edit, or delete user privileges.
Creating a New Profile
When you create new profiles, they show up on the SELECT A PROFILE TYPE panel with the four default templates (and any other custom profiles). However, they do not have the Default indicator. There is no limit to the number of new profiles you can create.
To create a profile:
-
Select System | ORGANIZATION MANAGEMENT | Role-Based Access Control.
-
If you're already on the Role-Based Access Control page, select View Other Profiles.
The SELECT A PROFILE TYPE panel appears.
-
Select a profile.
You can select any profile, including existing custom profiles. The selected profile is displayed.
-
Select Create New Profile from this Template.
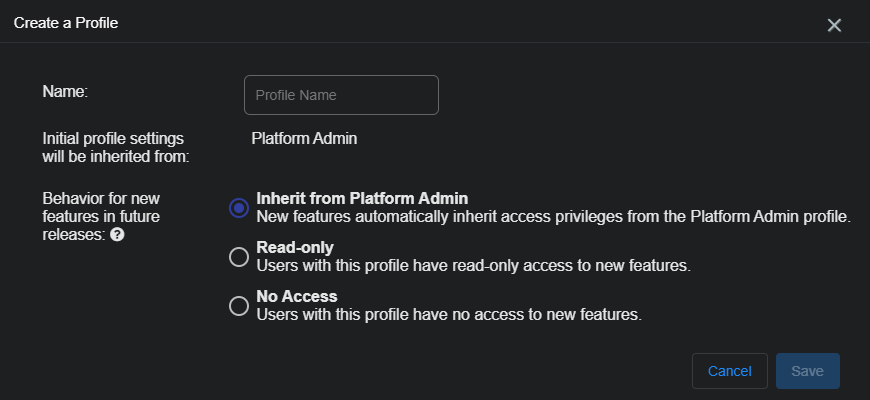
The Create a Profile screen appears.
-
Enter the name of the new profile.
-
Choose one of the Future Menu Access Options.
These options define how this profile manages the privileges for features added to Stellar Cyber in the future. The options are:
-
Inherit from ... – When new Stellar Cyber features are released, the privilege profile templates are updated to include privileges for the new features. Choose Inherit from ... if you want your custom template to inherit those updated privileges as-is.
A custom profile always inherits from one of the 4 default templates. If you create a new profile from an existing custom profile, the new one inherits from the same template as the existing one.
-
Read-only – Choose Read-only if you want your custom template to add the new features, but with read-only access privileges.
-
No Access – Choose No Access if you want your custom template to add the new features with no access privileges.
-
-
Select Save.
The profile is displayed again, but with the new name you defined and the privileges editable.
-
Save Changes.
Your changes take effect immediately, but you remain in the new profile to make more changes.
You can now assign this profile to users on the User Management page. It appears as an option in the User Privilege drop-down list.
For very conservative RBAC, create a new profile and choose No Access. Assign that profile to your users. While you could use a default profile template, that profile template will inherit a level of access to the new features. By creating a new profile and choosing No Access, you can review the new features and determine your own access privileges before giving any access to any users.
Editing a Profile
You can edit a profile at any time. To edit a profile:
-
Select System | ORGANIZATION MANAGEMENT | Role-Based Access Control and then select View Other Profiles.
The SELECT A PROFILE TYPE panel appears.
-
Select a custom profile (you cannot edit the four default profile templates).
The profile is displayed.
-
Save Changes.
Your changes take effect immediately, but you remain in the new profile to make more changes.
Defining Privileges
You can define access privileges globally and at the feature group, feature, and function levels. To define privileges, simply toggle privileges on or off.
If you see üand ü instead of toggles, you are looking at one of the four default templates, which you cannot edit. Create or view another profile.
Select Reset, at the bottom of the page, to reset all privileges to the last save.
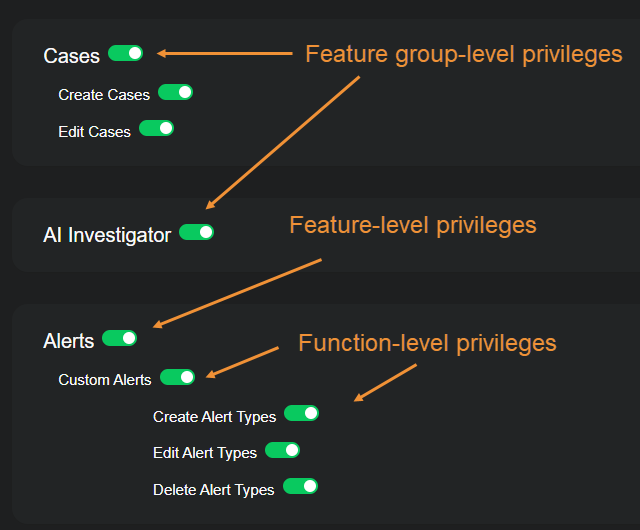
Feature Group-Level Privileges
You can enable or disable an entire group of features. If you disable this, pages for features in this group do not appear in Stellar Cyber for users with this user profile.
When you disable a feature group, all features and features in this group are also disabled.
To quickly enable all privileges for a group, toggle the group to disabled and then back to enabled. When you toggle it to enabled, all privileges underneath are also enabled.
For example, you can disable Help, which means that "?" will not appear in the menu bar, or you can disable Knowledge Base or Release Notes, which means that the Knowledge Base or Release Notes drop-down menus will not appear.
Feature-Level Privileges
You can enable or disable individual features. If you disable a feature, the link to the page for it does not appear in the menu for users with this user profile. For example, you can disable Alerts, which turns off the Detections | Alerts page.
The Root Only note indicates that a feature is only available for users with the Root scope, in addition to this privilege. Users must have both Root scope and this privilege.
To quickly enable all privileges under a page, toggle the page to disabled and back. When you toggle it to enabled, all privileges underneath are also enabled.
Function-Level Privileges
You can enable or disable functions under a feature. If you disable a function, that function appears but is disactivated in the Stellar Cyber UI for users with this user profile.
For example, if you disable Delete Alert Types, the option to delete alert types appears on the Alerts page but is grayed out.
To grant view-only privileges, disable all functions under a page, but leave the page enabled. The user can view the page (because it is enabled), but cannot perform any functions.
Privileges Example
For this example we'll look at some of the privileges for the System | Administration menu
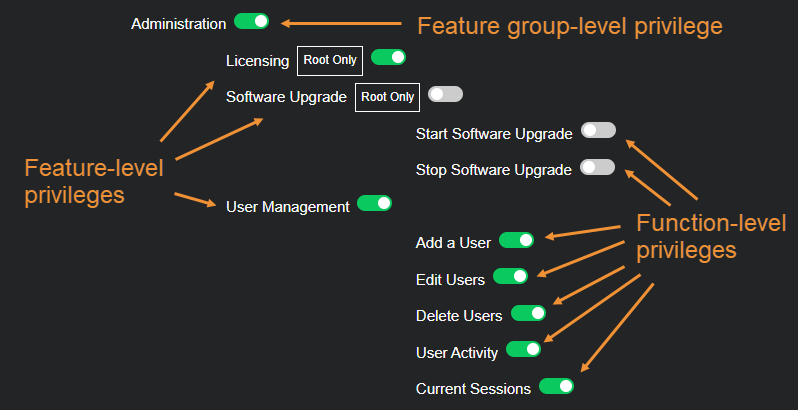
At the top, the Administration group of features is enabled for this profile. Users with this profile assigned will see the features in this group in the Stellar Cyber UI.
Under that grouping, features for Licensing and User Management are enabled. Users will see links to pages for these features in the navigation menu.
Software Upgrade is disabled and so are the functions for this feature: Start Software Upgrade and Stop Software Upgrade. Users with this profile will not see links to the Software Upgrade page in the navigation menu.
The Licensing feature also requires Root scope. Users will only see this feature if they have Root scope as well as this profile.
Deleting a Privilege Profile
To delete a privilege profile:
-
Select System | ORGANIZATION MANAGEMENT | Role-Based Access Control and then select View Other Profiles.
The SELECT A PROFILE TYPE screen appears.
-
Select a custom profile (you cannot delete the four default profile templates).
The profile is displayed.
-
Select Delete.
The profile is immediately deleted.
You cannot delete a profile if it's assigned to users. To quickly see the users a profile is assigned to and change it:
-
Select System | ORGANIZATION MANAGEMENT | Users.
-
Select the PRIVILEGE column to sort the table on privilege and then look for users with the privilege profile.
-
Select to edit the user.
-
Assign a different privilege profile in the User Privilege dropdown.
-
Submit.
Using Your IdP to Manage RBAC
If you use an IdP to provide SSO to Stellar Cyber, you can also use the IdP to manage RBAC:
-
Configure authorization on your IdP.
-
Configure SSO on the System | ORGANIZATION MANAGEMENT | Settings page, if you haven't done so already.
-
Choose Authentication and Authorization in the SSO configuration.
-
Submit.
| User |
Security Admin |
Platform Admin | Super Admin | |
|---|---|---|---|---|
|
View Data Pages XDR Kill Chain Dashboard, Cases, Alerts, Preset/Custom Dashboards/Charts. Not assignable but available to all roles. |
ü | ü | ü | ü |
|
Global Interflow Actions, Alert FiltersExport Running Status |
ü | ü | ü | ü |
|
Cases Create, Edit |
View only | ü | ü | ü |
|
Alerts View |
ü | ü | ü | ü |
|
Visualize Predefined and Custom Dashboards/Charts |
View only. No add/edit/delete privileges. System Status dashboard not available. | View, create, and edit. No delete privileges for custom dashboards/charts. System Status dashboard available with Root scope. | ü | ü |
|
Investigate Threat Hunting, Asset Analytics, User Behavior Analytics, Panoramic |
View only. No add/edit/delete privileges, or asset imports. Kibana plugin available with Root scope. | View, add, edit. No asset import, clear CSV import, or delete correlations privileges. |
ü | ü |
|
Respond Automation, Actions, and Reports/Scheduled Reports |
View only for Reporting, Alerting, and all Response Actions (Firewall, Active Directory, Script, and Endpoint). No add/edit/delete privileges. | View, add, edit. No delete privileges for reports or alerts. | ü | ü |
|
System Collection, Integrations (Connectors, Threat Intelligence, InSyncs), Data Processor, Detections (Detection Management, Exclusions), Configuration, Deployment, and Administration |
View only for Collection (Sensors, Sensor Profiles, Receivers, Filters |
|
|
ü |
